Flask-WTForms helps us create and use web forms with simple Python models. WTForms takes care of the tedious, boring and necessary security required when we want to use data submitted to our web app via a user on the Internet. WTForms makes data validation and Cross Sight Forgery Request (CSFR) avoidane a breeze. Out of the box, however, WTForms creates ugly forms with ugly validation. Flask-Bootstrap provides a professional layer of polish to our forms, with shading, highlights and pop ups.
Flask-Bootstrap also provides a "quick_form" method, which commands Jinja2 to render an entire web page based on our form model with one line of code.
In the real world, unfortunately, customers have strong opinions about their web pages, and may ask you to tweak the default appearance that "quick_form" generates. This blog post shows you how to do that.
In this blog post you will:
- Deploy a web app with a working form, to include validation and polish
- Tweak the appearance of the web page using a Flask-WTF macro
- Tweak the appearance of the web page using a Flask-Bootstrap method
The Baseline App
The following code shows the baseline Flask application, which uses "quick_form" to render the form's web page. Keep in mind that this application doesn't do anything, although you can easily extend it to persist data using an ORM (for example). I based the web app on the following Architecture:

The web app contains models.py (contains form model), take_quiz_template.html (renders the web page) and application.py (the web app that can route to functions based on URL and parse the form data).
[ec2-user@ip-192-168-10-134 ~]$ tree flask_bootstrap/
flask_bootstrap/
├── application.py
├── models.py
├── requirements.txt
└── templates
    └── take_quiz_template.html

1 directory, 4 files
[ec2-user@ip-192-168-10-134 ~]$
I put the files for this baseline Flask app on GitHub.
https://github.com/hatdropper1977/flask_bootstrap
Clone my project and take a look at the files I created. Be sure to checkout the baseline tag.
[centos@ip-172-31-1-82 ~]$ git clone git@github.com:hatdropper1977/flask_bootstrap.git
Cloning into 'flask_bootstrap'...
remote: Counting objects: 25, done.
remote: Compressing objects: 100% (20/20), done.
remote: Total 25 (delta 6), reused 19 (delta 4), pack-reused 0
Receiving objects: 100% (25/25), 8.12 KiB | 0 bytes/s, done.
Resolving deltas: 100% (6/6), done.
[centos@ip-172-31-1-82 ~]$
Once you clone the repo, enter the directory and checkout the baseline tag:
[centos@ip-172-31-1-82 ~]$ cd flask_bootstrap/
[centos@ip-172-31-1-82 flask_bootstrap]$ git checkout baseline
Previous HEAD position was b80045c... form_field
HEAD is now at 22b9bcc... baseline
[centos@ip-172-31-1-82 flask_bootstrap]$
Baseline includes the following files.
Create and activate your virtual environment and then install the required libraries.
[ec2-user@ip-192-168-10-134 flask_bootstrap]$ cd ..
[ec2-user@ip-192-168-10-134 ~]$ virtualenv flask_bootstrap/
New python executable in flask_bootstrap/bin/python2.7
Also creating executable in flask_bootstrap/bin/python
Installing setuptools, pip...done.
[ec2-user@ip-192-168-10-134 ~]$ . flask_bootstrap/bin/activate
(flask_bootstrap)[ec2-user@ip-192-168-10-134 ~]$ pip install -r flask_bootstrap/requirements.txt

  ...

Successfully installed Flask-0.11.1 Flask-Bootstrap-3.3.7.0 Flask-WTF-0.13.1 Jinja2-2.8 MarkupSafe-0.23 WTForms-2.1 Werkzeug-0.11.11 click-6.6 dominate-2.3.1 itsdangerous-0.24 visitor-0.1.3
(flask_bootstrap)[ec2-user@ip-192-168-10-134 ~]$
Start your flask application and then navigate to your IP address. Since this is just a dev application, you will need to access port 5000.
(flask_bootstrap)[ec2-user@ip-192-168-10-134 ~]$ cd flask_bootstrap/
(flask_bootstrap)[ec2-user@ip-192-168-10-134 flask_bootstrap]$ ./application.py
 * Running on http://0.0.0.0:5000/ (Press CTRL+C to quit)
 * Restarting with stat
 * Debugger is active!
 * Debugger pin code: 417-431-486
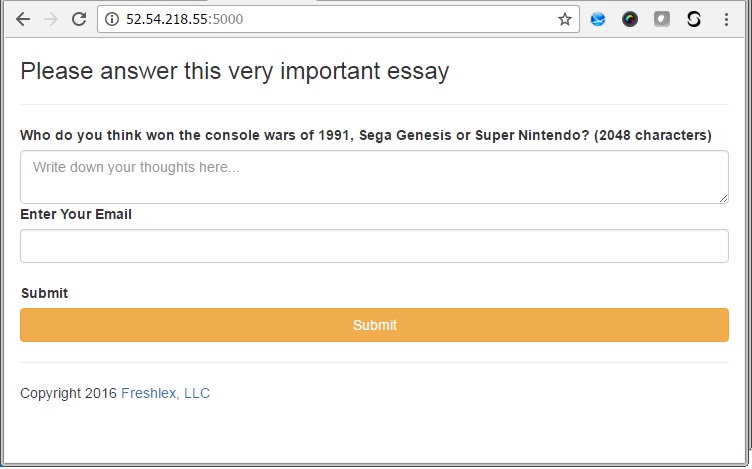
This application uses the quick_form method to generate a web page. Note that the application includes all sorts of goodies, such as CSFR avoidance, professional looking highlights and validation. Play around with the page to look at the different validation pop-ups and warnings.
Now imagine that your customer wants to change the look of the submit button, or add some default text. In this situation, the quick_form does not suffice.
Attempt 1: Use a Flask-WTF Macro
We can use vanilla Flask-WTF (vs. Flask-Bootstrap) to pass Bootstrap HTML attributes to WTForms.
To see this in action, check out the second version of the app via its Git tag.
[centos@ip-172-31-1-82 flask_bootstrap]$ git checkout formhelpers
D       app.py
Previous HEAD position was ada8bff... form_field
HEAD is now at f029a55... formhelpers
[centos@ip-172-31-1-82 flask_bootstrap]
The Flask-WTF docs describe a Macro named render_field which allows us to pass HTML attributes to Jinja2. We save this macro in a file named _formhelpers.html and stick it in the same templates folder as take_quiz_template.html.
{% macro render_field(field) %}
  <dt>{{ field.label }}
  <dd>{{ field(**kwargs)|safe }}
  {% if field.errors %}
    <ul class=errors>
    {% for error in field.errors %}
      <li>{{ error }}</li>
    {% endfor %}
    </ul>
  {% endif %}
  </dd>
{% endmacro %}
Now, update the take_quiz_template.html template to use the new macro. Note that we lose the quick_form shortcut and need to spell out each form field. In addition, we need to add HTML for the form an CSFR token.
{% extends "bootstrap/base.html" %}
{% import "bootstrap/wtf.html" as wtf %}
{% from "_formhelpers.html" import render_field %}
{% block content %}
  <div class="container">
  <h3>Please answer this very important essay</h3>
  <p>If you don't it'll go on your permanent record!.</p>
<hr>
<form action="" method="post" class="form" role="form">
  {{ form.csrf_token() }}
 <d1>
   {{ render_field(form.essay_question, class='form-control', placeholder='Write down your thoughts here...') }}
   {{ render_field(form.email_addr, class='form-control', placeholder='Enter email') }}
 </d1>
 <p><input type=submit class='btn btn-warning btn-block'>
</form>
<hr>
<p>Copyright 2018 <a href="https://john.soban.ski">Freshlex, LLC</a></p>
</div>
{% endblock %}
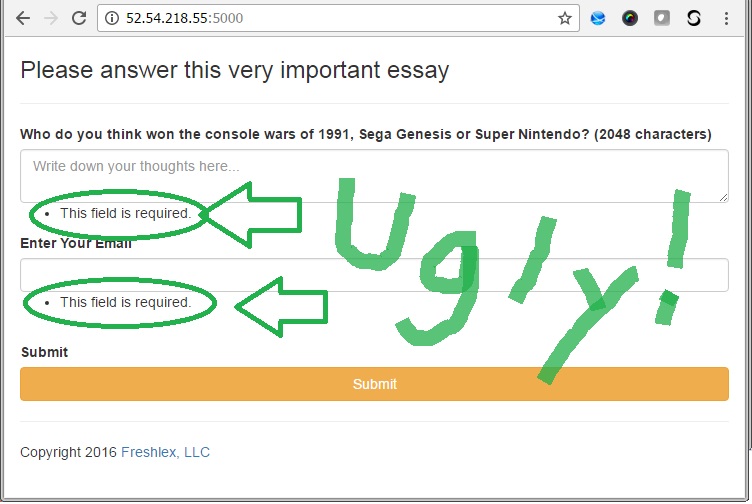
When you go to your web page you will see the default text we added to the input fields via render_field:
   {{ render_field(form.essay_question, class='form-control', placeholder='Write down your thoughts here...') }}
   {{ render_field(form.email_addr, class='form-control', placeholder='Enter email') }}
You will also see an orange submit button that spans the width of the page:
<p><input type=submit class='btn btn-warning btn-block'>
You can see both of these changes on the web page:
Unfortunately, if you click submit without entering any text, you will notice that we have reverted to ugly validations.
Attempt 2: Use Flask-Bootstrap
In this attempt, we will use Flask-Bootstap directly to pass the attributes to Flask-WTF, thus obviating the need for the _formhelpers.html macro.
Although pretty much hidden in the Flask-Bootstrap documents, it turns out you can add extra HTML elements directly to the template engine using form_field.
Check out the third version of the app, using the Git tag.
[centos@ip-172-31-1-82 flask_bootstrap]$ git checkout form_field
D       app.py
Previous HEAD position was 0ba0f8a... baseline
HEAD is now at ada8bff... form_field
[centos@ip-172-31-1-82 flask_bootstrap]$
The new template does not need to import the render_field macro from _formhelpers.html:
{% extends "bootstrap/base.html" %}
{% import "bootstrap/wtf.html" as wtf %}
{% block content %}
  <div class="container">
  <h3>Please answer this very important essay</h3>
  <p>If you don't it'll go on your permanent record!.</p>
<hr>
<form action="" method="post" class="form" role="form">
  {{ form.csrf_token() }}
 <d1>
  {{ wtf.form_field(form.essay_question, class='form-control', placeholder='Write down your thoughts here...') }}
  {{ wtf.form_field(form.email_addr, class='form-control', placeholder='your@email.com') }}
 </d1>
 <p><input type=submit class='btn btn-warning btn-block'>
</form>
<hr>
<p>Copyright 2018 <a href="https://john.soban.ski">Freshlex, LLC</a></p>
</div>
{% endblock %}
As before, we add default text with "placeholder:"
{{ wtf.form_field(form.essay_question, class='form-control', placeholder='Write down your thoughts here...') }}
{{ wtf.form_field(form.email_addr, class='form-control', placeholder='your@email.com') }}
We then customize the submit button. You can customize the button however you would like. Take a look here for more ideas.
<p><input type=submit class='btn btn-warning btn-block'>
This gives us a bootstrap rendered page with pretty validation:
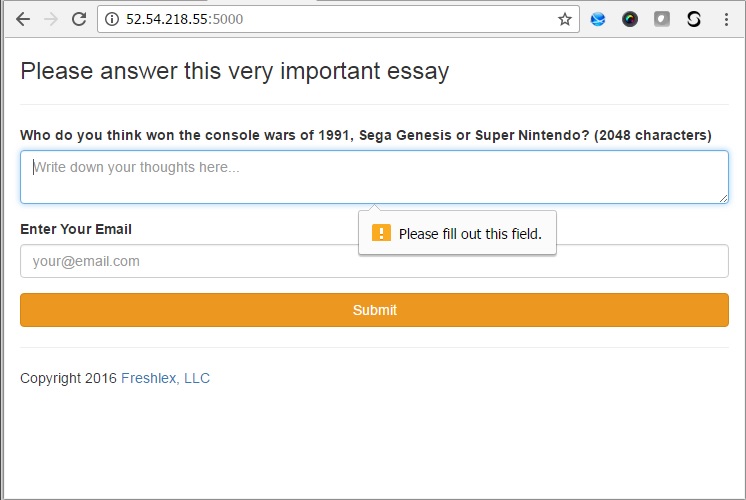
As you can see, we get a popup if we attempt to submit without entering text, submit without entering an email, or enter an invalid email address.
Conclusion
You now have a working web application that easily renders professional looking forms with validation and pop-ups. In the future you can trade ease of deployment against customability.
If you enjoyed this blog post, you may be interested in how to quickly add reCAPTCHA to your app using Flask-WTF, how to use the Flask-like Chalice to quickly deploy a web app to Lambda, or my five part series on how to deploy a Flask application (with an Elasticsearch back-end) to the Amazon Web Services ecosystem:
- Part One:
- Deploy an Amazon Web Service (AWS) Elasticsearch (ES) domain
- Use Identity and Access Management (IAM) roles, IAM profiles and the boto library to connect a server to the ES domain
- Part Two:
- Deploy a Flask web server
- Program the Flask web server to proxy and filter user inputs to ES
- Learn the Python WTForms library and the Python Elasticsearch Domain Specific Language (DSL)
- Part Three:
- Use Bootstrap for form validation
- Give the Proxy a professional, polished appearance
- Part Four:
- Connect Elastic Beanstalk (EBS) to Elasticsearch via AWS Identity and Access Management
- Deploy the Flask server to EBS
- Part Five:
- Learn the benefits of asynchronous tasks
- Deploy an Amazon Simple Queue Service (SQS) message Queue
- Make Celery on our Flask controller
- Deploy Celery worker nodes
- Call a remote web service via a Representative State Transfer (REST) Application Programming Interface (API)