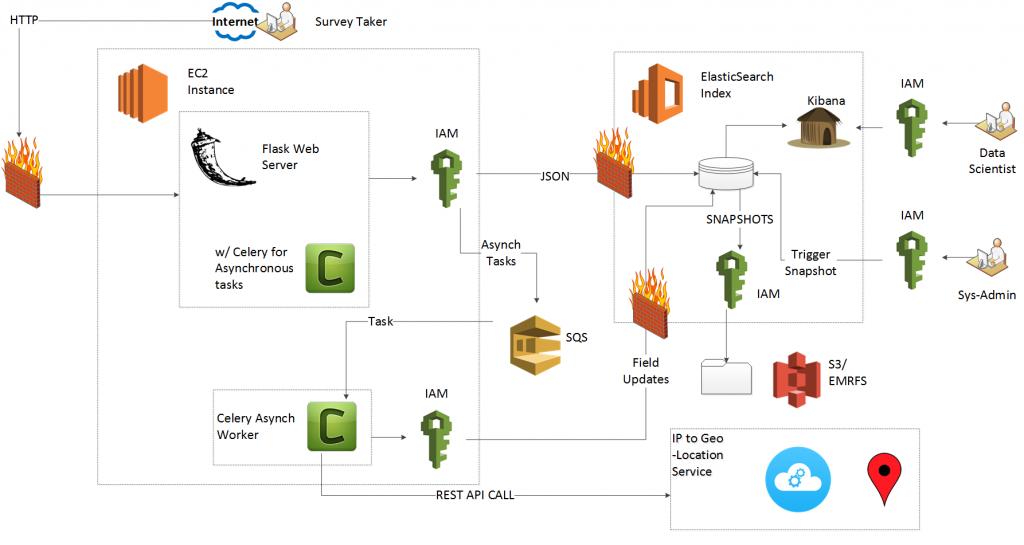
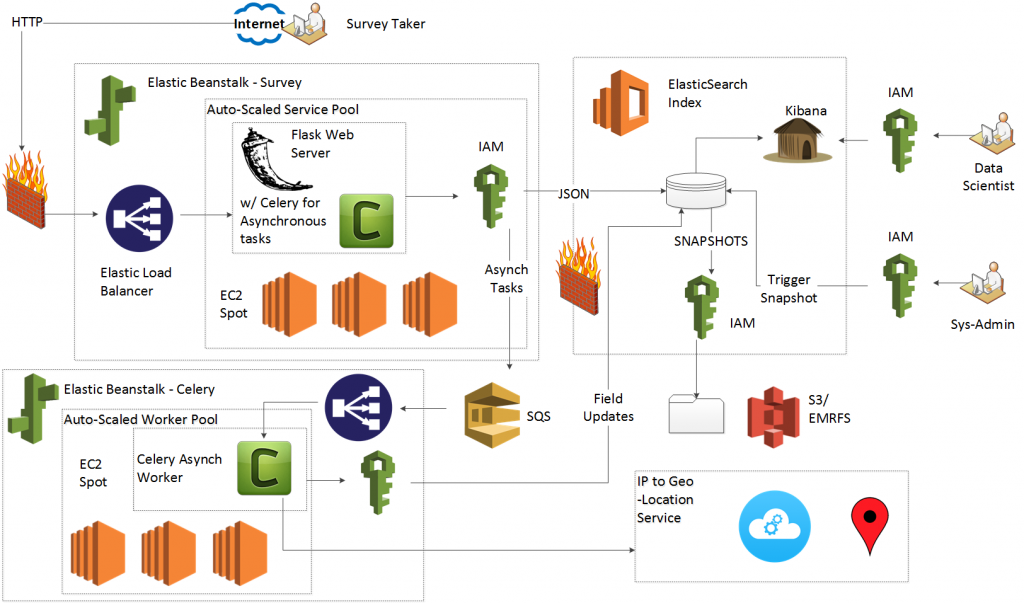
Welcome to the fifth part of this HOWTO, where we will call a remote web service to locate our test takers. Once you complete this HOWTO, you will have implemented the following architecture:
To recap what we’ve done so far:
- Part One:
- Deploy an Amazon Web Service (AWS) Elasticsearch (ES) domain
- Use Identity and Access Management (IAM) roles, IAM profiles and the boto library to connect a server to the ES domain
- Part Two:
- Deploy a Flask web server
- Program the Flask web server to proxy and filter user inputs to ES
- Learn the Python WTForms library and the Python Elasticsearch Domain Specific Language (DSL)
- Part Three:
- Use Bootstrap for form validation
- Give the Proxy a professional, polished appearance
- Part Four:
- Connect Elastic Beanstalk (EBS) to Elasticsearch via AWS Identity and Access Management
- Deploy the Flask server to EBS
In this tutorial we will:
- Learn the benefits of asynchronous tasks
- Deploy an Amazon Simple Queue Service (SQS) message Queue
- Make Celery on our Flask controller
- Deploy Celery worker nodes
- Call a remote web service via a Representative State Transfer (REST) Application Programming Interface (API)
Let’s take advantage of Kibana’s elegant geospatial (GEO) search function, and search for “think piece” keywords (“lonely,” “tired,” “happy,” “hungry” etc.) based on location. Freegeoip.net offers a free REST API to convert Internet Protocol (IP) addresses to GEO coordinates.
Asynchronous Calls to Remote Web Services
A call to a remote web service will inject seconds of latency to the timeline. The REST call must exit the local data center to an unknown location which could be anywhere on the planet. In addition to propagation due to latency, the REST call can expect firewalls, packet inspection, queuing and transmission delays. Once the call arrives at the remote server, the remote server may block the call, put the call on a queue or drop it all together. Due to the unpredictable channel, we cannot put GEO tagging on the “critical path” from quiz results to database entry. To overcome this unreliable, slow, yet necessary service we’ll use asynchronous calls.
The controller takes the data from the test taker, validates it and sends it to the Elasticsearch document store. The controller also takes the data and sends it to a message queue (provided for by AWS Simple Queue Service [SQS]). Celery worker nodes watch the queue and pull off tasks as they arrive. Each worker node then makes independent calls to the service. Latency does not affect critical operations. The worker nodes update the Elasticsearch documents with information as they get it.
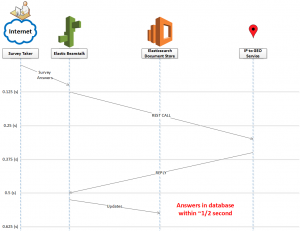
A simple graphic illustrates this. Imagine that the web services remain in line. The controller cannot commit the document data until both services return. The server blocks for about 1/2 a second until it can update the document store (I use representative data for latency due to processing and propagation delay).
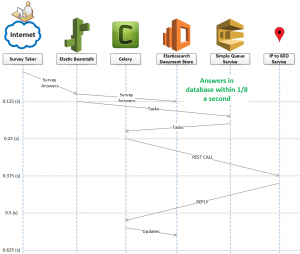
Now consider a parallel approach that uses worker nodes and a message queue. We now get the same functionality, with the server freed up in 1/8 of a second.
The free ‘IP to geolocation’ coordinate service does not require a login. We can use an HTTP GET to access it like any web page. In order to use Celery, we need to both configure application.py (the controller) as well as deploy worker nodes as separate services.
Launch an Amazon Simple Queue Service (SQS)
Amazon made the deployment of a Simple Queue Service (SQS) easy. First, from the Amazon Console, find the “Application Services” section and then click SQS.
When you enter the SQS console, click “Create Queue.”

Then, when you see the queue creation wizard, enter the name “flask-es.”
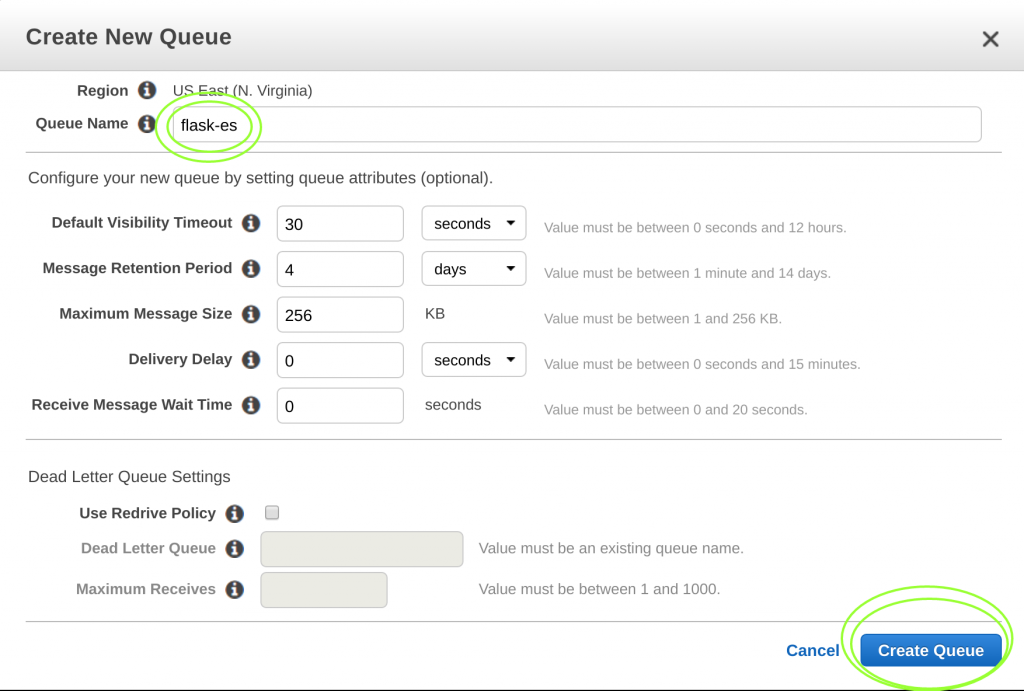
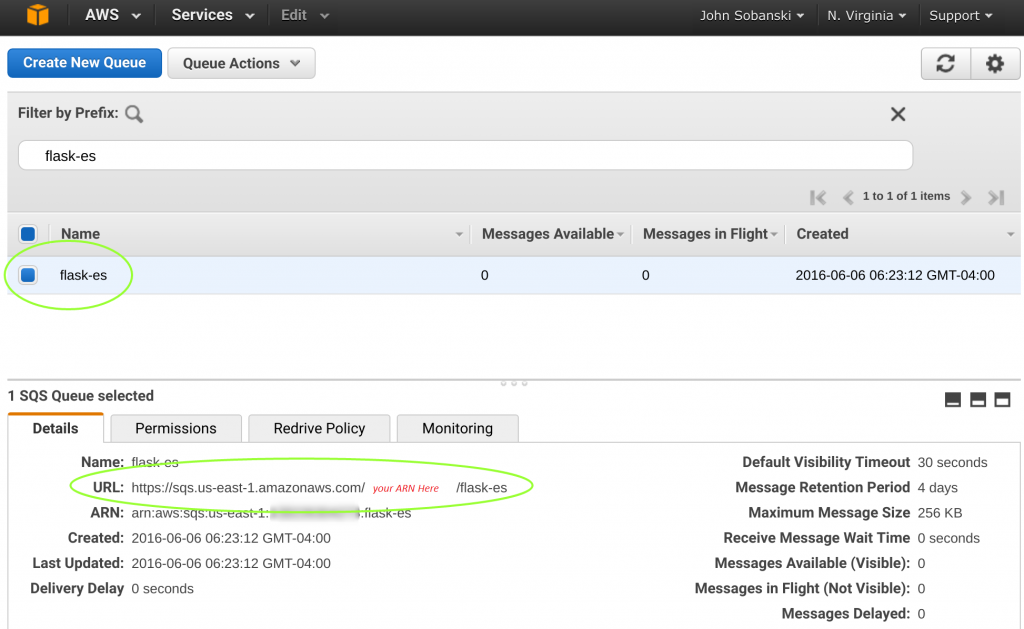
Click “Create Queue” to create the queue. Once AWS deploys the queue, make note of the URL for the SQS queue. In the example below, the SQS queue lives at ‘sqs://sqs.us-east-1.amazonaws.com//flask-es.’
 Add SQS Policy to your Jumpbox Role
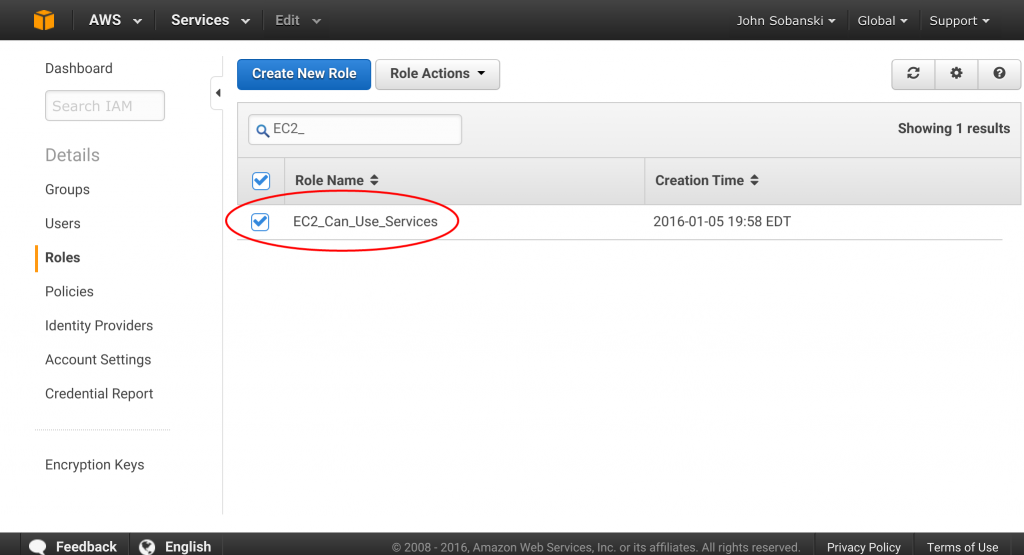
HOWTO-1 we created and assigned an IAM role to our Jumpbox. If you remember, we named that role EC2_Can_Use_Services.
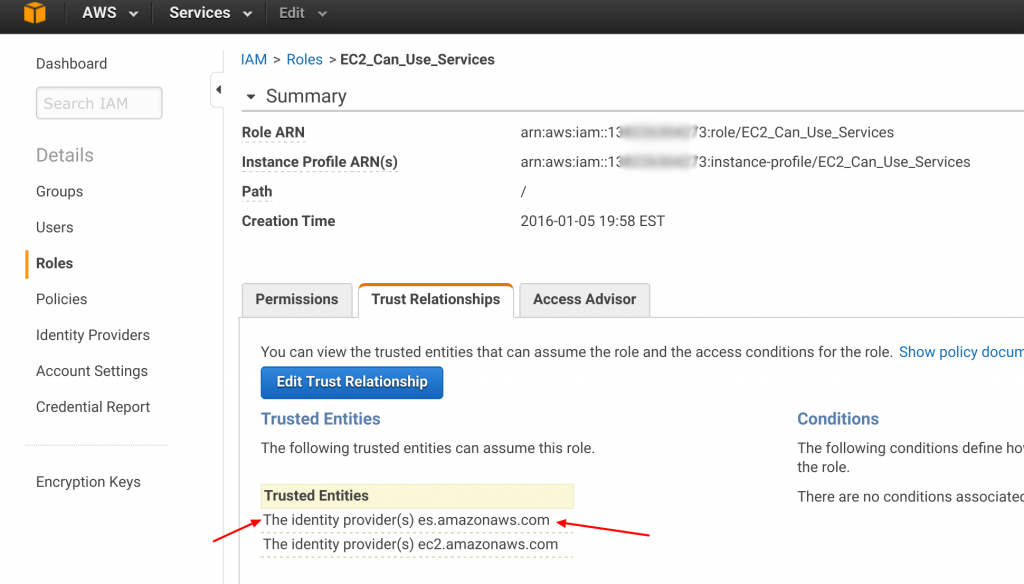
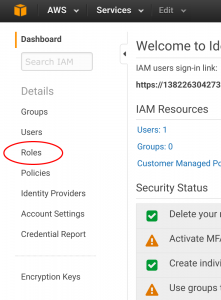
That hard work pays off again and again. Right now we will simply add an SQS policy to our existing role. On the AWS console, click on the IAM icon.
Then select "Roles" from the choices on the right.
 Now filter the roles and locate "EC2_Can_Use_Services."
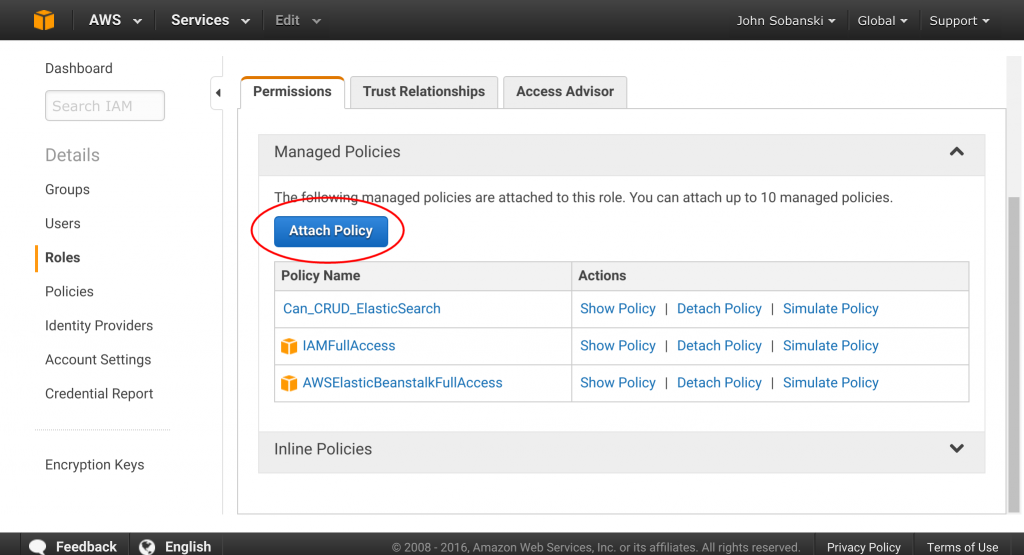
Click the "Attach Policy" Button.
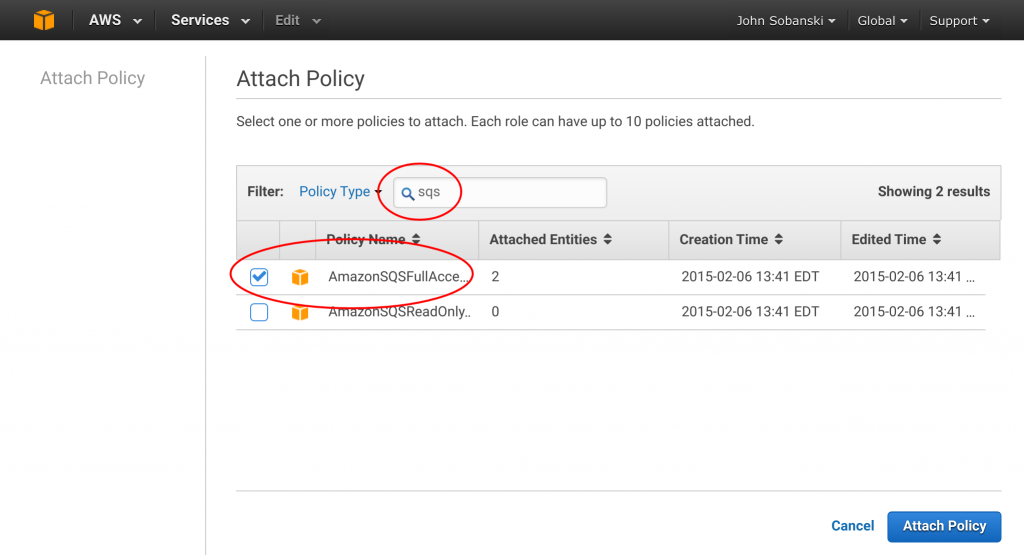
Filter for "SQS," select "Full Access" and attach. All done!
Make Celery on the Controller
Similar to Bootstrap, where we Bootstrapped our Flask application to use Bootstrap, we need to “Celery” our Flask application. We first activate our environment and then install the Celery Python library.
ubuntu@ip-172-31-34-189:~$ cd flask_to_es/
ubuntu@ip-172-31-34-189:~/flask_to_es$ . bin/activate
(flask_to_es)ubuntu@ip-172-31-34-189:~/flask_to_es$ pip install Celery
Downloading/unpacking Celery
...
Successfully installed Celery kombu billiard amqp anyjson
Cleaning up...
(flask_to_es)ubuntu@ip-172-31-34-189:~/flask_to_es$
First, we import the Celery library. Then, we extend the Celery object to accommodate the Flask application and point to our newly deployed AWS Simple Queue Service (SQS). After we initialize and Bootstrap our Flask application we send it to Celery. The following snippet shows the pertinent code:
from boto.connection import AWSAuthConnection

...

from flask_bootstrap import Bootstrap

### BEGIN CELERY
from celery import Celery

def make_celery(application):
    celery = Celery(application.import_name, broker=application.config['CELERY_BROKER_URL'])
    celery.conf.update(application.config)
    TaskBase = celery.Task
    class ContextTask(TaskBase):
        abstract = True
        def __call__(self, *args, **kwargs):
            with application.app_context():
                return TaskBase.__call__(self, *args, **kwargs)
    celery.Task = ContextTask
    return celery
### DONE CELERY


application = Flask(__name__)
application.config.from_object(DevConfig)
### Point to the new AWS SQS
#   Be sure to change the URL to your CELERY_BROKER
application.config.update(CELERY_BROKER_URL='sqs://sqs.us-east-1.amazonaws.com/<your ARN>/flask-es')

Bootstrap(application)

### Wrap the bootstrapped application in celery
celery = make_celery(application)
On the worker side, we create “celery tasks” which poll the message queue until they receive a task. Upon receipt of a task, the workers will execute a call to the GEO lookup service. The controller passes the IP address and user ID to the worker node via the SQS queue. The worker node then appends the IP address to the freegeoip.net REST API GET method and strips the latitude and longitude from the response. The worker node then serializes the data into a JSON format suitable for the Elasticsearch REST API, and updates the document for the given IP.
On the controller side, we add the task decorators and then update the ‘submit’ logic on the test taking route to include the asynchronous tasks. See the bottom of this post for the full code.
# application.py (snippet)
# The asynch tasks
        get_location.delay(dict_resp['_id'],completed_quiz.client_ip_addr)
# Asychs task complete
Hot Tip: It took me a while to troubleshoot an un-intuitive, Celery related issue. In order to properly connect the controller and worker to the SQS queue, the task name on the controller side needs to be named ‘tasks.get_location’, instead of just ‘get_location.’
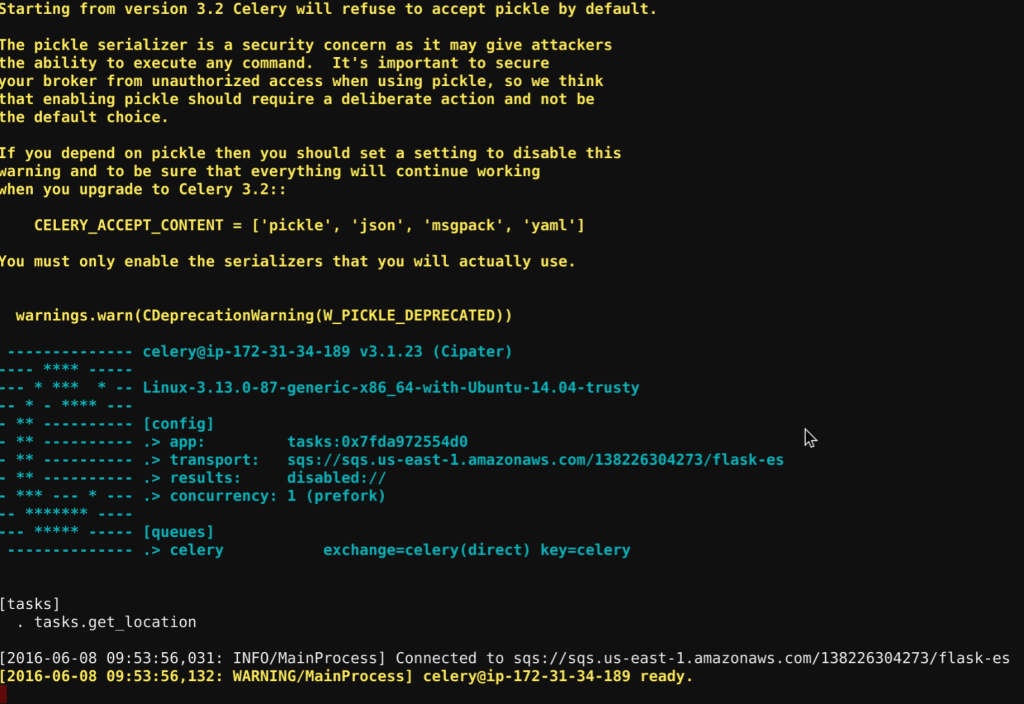
Start the service
Run the following command from your shell:
(flask_to_es)ubuntu@ip-172-31-34-189:~/flask_to_es$ /home/ubuntu/flask_to_es/bin/celery -A tasks worker --loglevel=INFO
When you deploy to operations, you will want to daemonize the process with supervisord, and for now the command line suffices. When you run the command, you will see a very colorful splash screen:
Open a second console, activate the virtual environment and run your server:
ubuntu@ip-172-31-34-189:~$ cd flask_to_es/
ubuntu@ip-172-31-34-189:~/flask_to_es$ . bin/activate
(flask_to_es)ubuntu@ip-172-31-34-189:~/flask_to_es$ python application.py
 * Running on http://0.0.0.0:5000/ (Press CTRL+C to quit)
 * Restarting with stat
 * Debugger is active!
 * Debugger pin code: 123-456-789
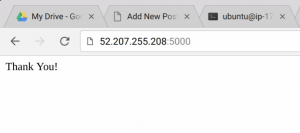
Test Drive
Go to your application. We did not yet deploy to ElasticBeanstalk so you will need to go to the Public IP of your jump box, port 5000. Fill in the survey and click ‘submit.’ If everything works, you should see “Thank You” on your web browser.
In your Celery window, you will read the following messages:
[2016-06-07 23:57:01,704: INFO/MainProcess] Received task: tasks.get_location[870211c4-f6ce-48c9-940c-0f19948597af]
[2016-06-07 23:57:01,713: INFO/Worker-1] Starting new HTTP connection (1): freegeoip.net
[2016-06-07 23:57:04,804: INFO/MainProcess] Task tasks.get_location[870211c4-f6ce-48c9-940c-0f19948597af] succeeded in 3.099452137s: None
The messages tell us that our worker node reached out to freegeoip.net, executed an API call via HTTP and then exited successfully.
Up until now, no documents included the “Geo” field. We will ask Elasticsearch to pull all documents from the index that include a Geo field. If ES returns a document, then we prove that the Celery worker updated a document with API results (coordinates). Since we use IAM roles, we cannot use CURL to query the database and instead use the following simple Python script.
Execute the Python script to see the results. Notice in the JSON, we now have a GEO field, that maps the IP address to coordinates.
{
  "took" : 6,
  "timed_out" : false,
  "_shards" : {
    "total" : 5,
    "successful" : 5,
    "failed" : 0
  },
  "hits" : {
    "total" : 1,
    "max_score" : 1.0,
    "hits" : [ {
      "_index" : "big_survey",
      "_type" : "quiz",
      "_id" : "AVUsOZyl9Pmr_JRmr5sA",
      "_score" : 1.0,
      "_source":{"tags":["v0.1"],"email_addr":"Maddog@mcree.com","client_ip_addr":"66.87.83.246","iso_timestamp":"2016-06-07T23:57:01.055537","essay_question":"The Phillips CDi won.","is_spam":false,"geo":"38.9827,-77.004"}
    } ]
  }
}
In the next HOWTO, we will modify the “Geo” field type in the Elasticsearch document mapping and use the Kibana GUI to find quiz takers’ locations via a Google Maps like interface.
Extra Credit
Since you completed all of the HOWTO’s so far, you have the skills needed to deploy the Flask web server and Celery worker nodes to Elastic Beanstalk. For extra credit, deploy the following architecture:
application.py full code