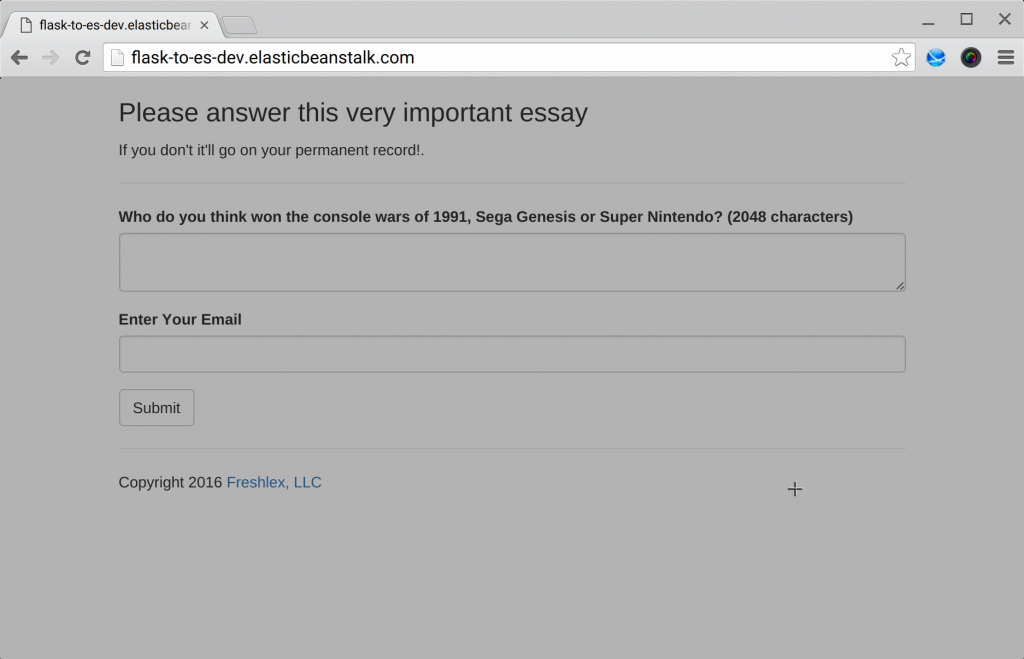
- In HOWTO-1, we deployed an Amazon Web Service (AWS) Elasticsearch domain and connected to it via a combination of Identity and Access Management (IAM) roles, IAM profiles and the Boto library.
- In HOWTO-2 we deployed a Flask web server that proxies and filters user inputs to our Elasticsearch service via WTForms and the Python Elasticsearch Domain Specific Language (DSL).
- HOWTO-3 uses Bootstrap for form validation and to give our Proxy a professional, polished appearance.
In this tutorial, we will execute the following:
- Give our Jumpbox the credentials to deploy an ElasticBeanstalk (EBS) instance
- Give our Jumpbox the credentials to assign roles to AWS services
- Edit our Flask server for EBS deployment
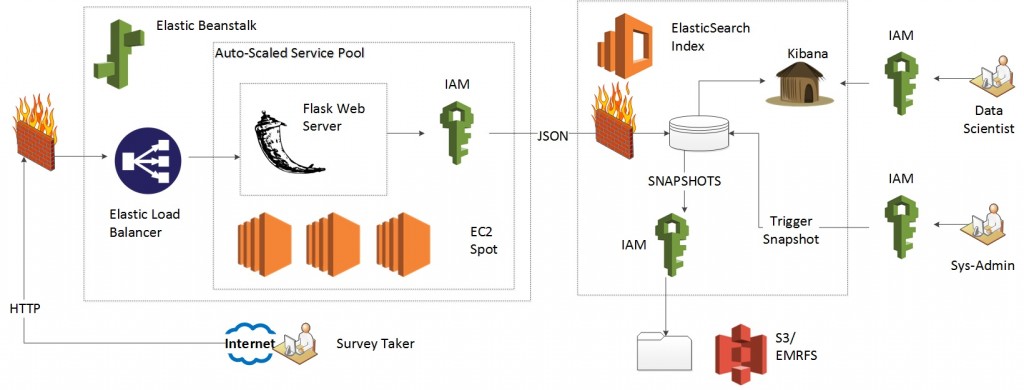
Once complete, we will have the following Architecture:
Activate the virtual environment for your flask_to_es project:
ubuntu@ip-172-31-35-80:~$ cd flask_to_es/
ubuntu@ip-172-31-35-80:~/flask_to_es$ . bin/activate
(flask_to_es)ubuntu@ip-172-31-35-80:~/flask_to_es$
Execute a "pip freeze," which lists the installed libraries for the Virtual Environment.
(flask_to_es)ubuntu@ip-172-31-35-80:~/flask_to_es$ pip freeze
DateTime==4.0.1
Flask==0.10.1
Flask-Bootstrap==3.3.5.7
Flask-WTF==0.12
Jinja2==2.8
MarkupSafe==0.23
WTForms==2.1
Werkzeug==0.11.3
argparse==1.2.1
boto==2.38.0
dominate==2.1.16
elasticsearch==2.2.0
elasticsearch-dsl==0.0.9
itsdangerous==0.24
python-dateutil==2.4.2
pytz==2015.7
six==1.10.0
urllib3==1.14
visitor==0.1.2
wsgiref==0.1.2
zope.interface==4.1.3
(flask_to_es)ubuntu@ip-172-31-35-80:~/flask_to_es$
You should see libraries related to Flask, Boto and Elasticsearch. Save the output of the file to a file named "requirements.txt." EBS requires this information in a file that must be named "requirements.txt." When you deploy your application to EBS, the AWS service reads the contents of "requirements.txt" and installs all the listed packages.
(flask_to_es)ubuntu@ip-172-31-35-80:~/flask_to_es$ pip freeze > requirements.txt
(flask_to_es)ubuntu@ip-172-31-35-80:~/flask_to_es$
In the past three HOWTO instructions, we used the AWS GUI to deploy services. For ElasticBeanstalk, we must use the AWS Command Line Interface (CLI).
Install the CLI into your Operating System (OS) (not virtual environment):
(flask_to_es)ubuntu@ip-172-31-35-80:~/flask_to_es$ deactivate
ubuntu@ip-172-31-35-80:~/flask_to_es$ sudo pip install awsebcli
Downloading/unpacking awsebcli
  Downloading awsebcli-3.7.3.tar.gz (172kB): 172kB downloaded
  Running setup.py (path:/tmp/pip_build_root/awsebcli/setup.py) egg_info for package awsebcli

...

Successfully installed awsebcli pyyaml botocore cement colorama pathspec docopt requests texttable websocket-client docker-py dockerpty blessed docutils jmespath python-dateutil backports.ssl-match-hostname wcwidth
Cleaning up...
ubuntu@ip-172-31-35-80:~/flask_to_es$
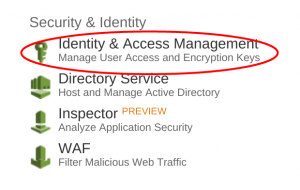
We need to give our jumpbox credentials both to deploy an ElasticBeanstalk (EBS) service and pass a role to the EBS service. The awsebcli provided "eb init" command automatically creates the necessary roles and profiles for your ElasticBeanstalk environment. In order for this to occur, your jumpbox must also have the necessary credentials to create, list and pass IAM roles and profiles. Grant accesses to your jumpbox via the AWS Console. First, click the IAM dashboard icon.
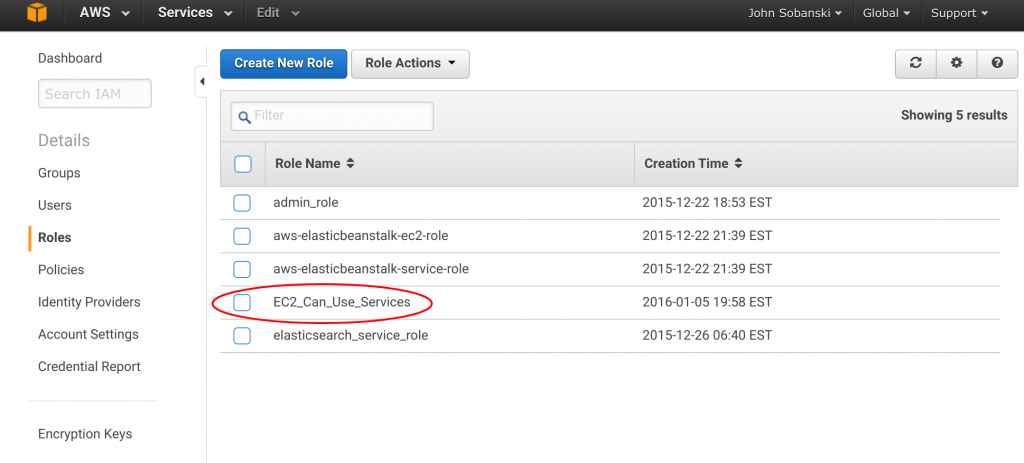
Then, under "Dashboard" click "roles:"
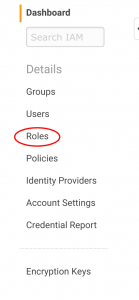
You may or may not have several roles. Pick the IAM role you applied to your jumpbox in HOWTO-1, the role named "EC2_Can_Use_Services:"
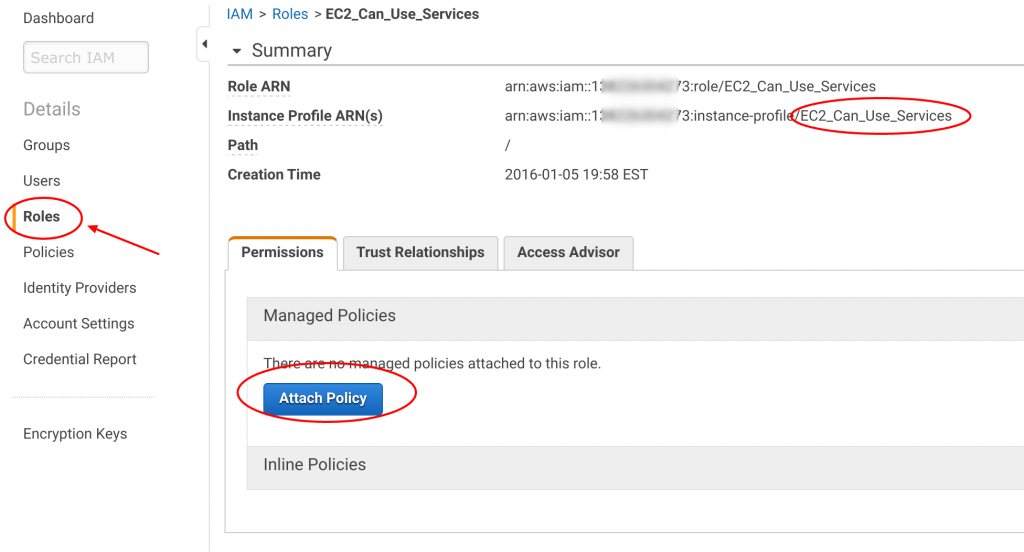
You will see the policy we attached in HOWTO-1. Click "Attach Policy:"
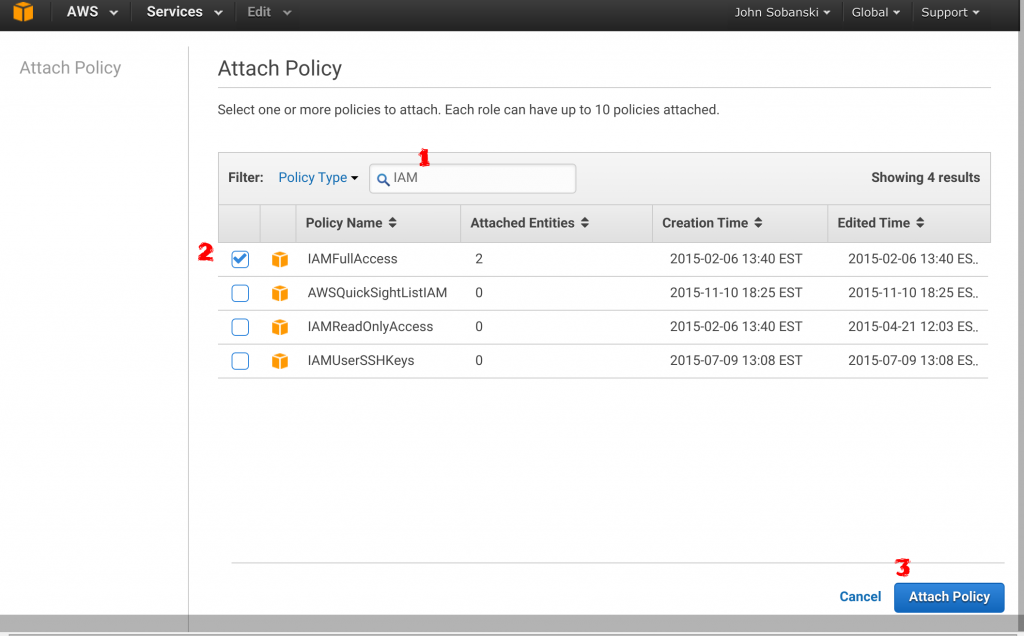
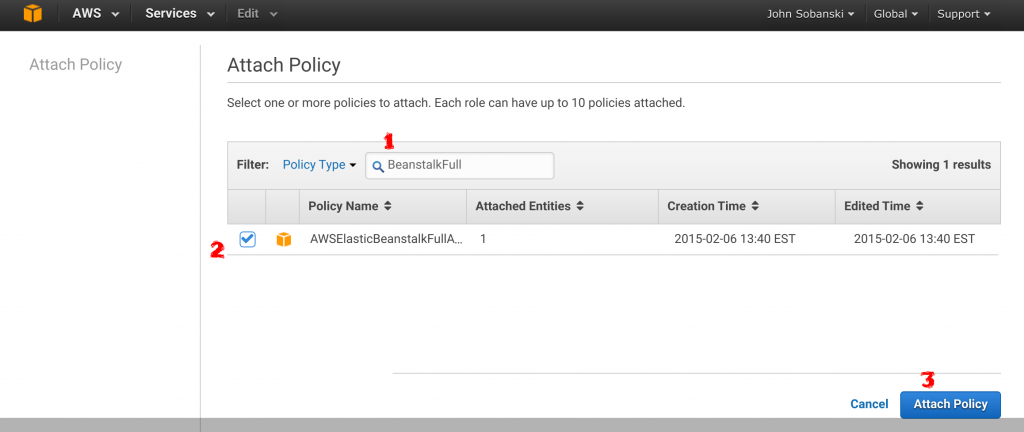
In the "Filter: Policy Type" search box, type "IAM" (1). Then, check the "IAMFullAccess" policy (2). Then click "Attach Policy" (3):
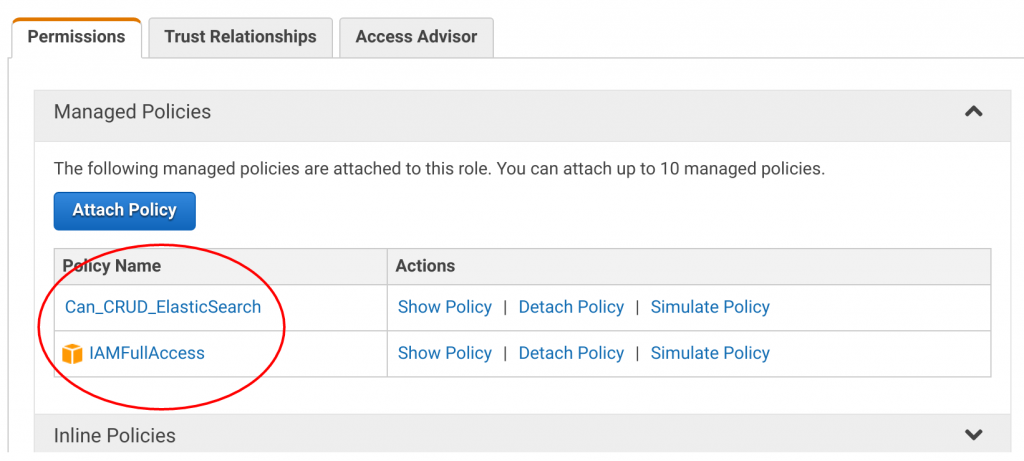
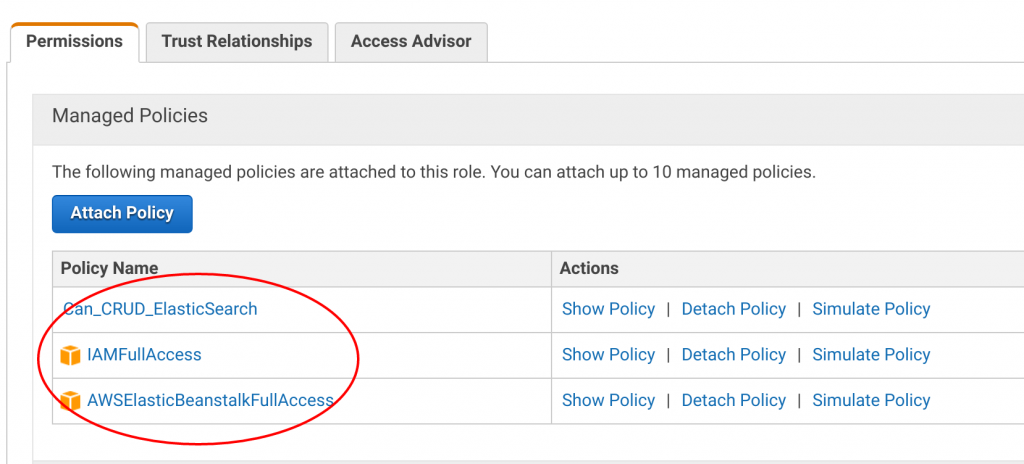
The "EC2_Can_Use_Services" IAM role that you applied to your jumpbox now lists two attached policies.
Click "Attach Policy" once more and in the search box type "Beanstalk Full." Select and attach this policy.
Your role console now shows three attached policies. Good work!
Go back to your shell and listen to the good news. We already configured our application for compatible deployment to ElasticBeanstalk.
HOT TIP: To deploy a Flask server to ElasticBeanstalk be sure to:
- Name your application application.py
- Name your Flask object application (not app)
- Connect via the @application.before_first_request decorator
- Make your extended AWSAuthConnection object a global
- List all necessary Python libraries in a file named requirements.txt
Let's quickly look at the bullets above:
Name your application application.py
That should be easy enough. Instead of "main.py," "app.py" or "my_app.py" just name the main application "application.py."
Name your Flask object application (not app)
from boto.connection import AWSAuthConnection
from flask import Flask, render_template, request, redirect, url_for, flash
from models import Quiz, QuizForm
from datetime import datetime
from config import DevConfig
import json
from flask_bootstrap import Bootstrap

application = Flask(__name__)
application.config.from_object(DevConfig)
Bootstrap(application)
Connect via the @application.before_first_request decorator and make your extended AWSAuthConnection object a global
class ESConnection(AWSAuthConnection):
    def __init__(self, region, **kwargs):
        super(ESConnection, self).__init__(**kwargs)
        self._set_auth_region_name(region)
        self._set_auth_service_name("es")
    def _required_auth_capability(self):
        return ['hmac-v4']

@application.before_first_request
def make_connect():
    global client
        # Note, BOTO receives credentials from the EC2 instance's IAM Role
    client = ESConnection(
      region='us-east-1',
      # Be sure to enter the URL of YOUR Elasticsearch Service!!!
      host='search-test-domain-ircp547akjoolsbp4ehu2a56u4.us-east-1.es.amazonaws.com',
      is_secure=False)
List all necessary Python libraries in a file named requirements.txt
We already did this at the start of this HOWTO.
Deploy your application to EBS
Since we laid all of the groundwork, we just need to deploy the application. Go to you shell and change directories to the inside of the \~/flask_to_es directory. From there, type 'eb init' and step through the menu items. I list the choices I made below:
ubuntu@ip-172-31-35-80:~$ cd flask_to_es/
ubuntu@ip-172-31-35-80:~/flask_to_es$ ls
application.py  bin  config.py  connect_test.py  lib  local  models.py  requirements.txt  templates
ubuntu@ip-172-31-35-80:~/flask_to_es$ eb init

Select a default region
1) us-east-1 : US East (N. Virginia)
2) us-west-1 : US West (N. California)
3) us-west-2 : US West (Oregon)
4) eu-west-1 : EU (Ireland)
5) eu-central-1 : EU (Frankfurt)
6) ap-southeast-1 : Asia Pacific (Singapore)
7) ap-southeast-2 : Asia Pacific (Sydney)
8) ap-northeast-1 : Asia Pacific (Tokyo)
9) ap-northeast-2 : Asia Pacific (Seoul)
10) sa-east-1 : South America (Sao Paulo)
11) cn-north-1 : China (Beijing)
(default is 3): 1

Select an application to use
1) bdpt
2) [ Create new Application ]
(default is 2): 2

Enter Application Name
(default is "flask_to_es"):
Application flask_to_es has been created.

It appears you are using Python. Is this correct?
(y/n):  y

Select a platform version.
1) Python 3.4
2) Python
3) Python 2.7
4) Python 3.4 (Preconfigured - Docker)
(default is 1): 3
Do you want to set up SSH for your instances?
(y/n): y

Select a keypair.
1) Sobkey
2) [ Create new KeyPair ]
(default is 2): 1
ubuntu@ip-172-31-35-80:~/flask_to_es$
After initializing the flask_to_es directory, type eb create to create an environment. Amazon offers suggestions for the name. I list my choices below:
ubuntu@ip-172-31-35-80:~/flask_to_es$ eb create
Enter Environment Name
(default is flask-to-es-dev):
Enter DNS CNAME prefix
(default is flask-to-es-dev):
Creating application version archive "app-160212_121025".
Uploading: [##################################################] 100% Done...
Environment details for: flask-to-es-dev
  Application name: flask_to_es
  Region: us-east-1
  Deployed Version: app-160212_121025
  Environment ID: e-2hhrra2wc9
  Platform: 64bit Amazon Linux 2015.09 v2.0.7 running Python 2.7
  Tier: WebServer-Standard
  CNAME: flask-to-es-dev.elasticbeanstalk.com
  Updated: 2016-02-12 12:10:24.558000+00:00
Printing Status:
INFO: createEnvironment is starting.

...

INFO: Environment health has transitioned from Pending to Ok.
INFO: Successfully launched environment: flask-to-es-dev

ubuntu@ip-172-31-35-80:~/flask_to_es$
Take a look at the following line below:
Platform: 64bit Amazon Linux 2015.09 v2.0.7 running Python 2.7
Amazon auto deploys a Linux server for your application. You provide the Python code and Amazon takes care of all of the Integration, System Administration, Patching, Updates, Security and server housekeeping. In fact, Amazon monitors the CPU, Memory and Disk usage and will deploy and load balance additional servers if you need it. If you worked as a systems engineer, integrator or administrator you understand that keeping a server fresh, secure and running takes a major effort. Also, unless you buy a premier load balancer appliance such as A10 Networks, load balancing becomes a pain, and with virtualized load balancers and/ or SSL it becomes a tough problem.
In the deployment output above, find the line:
CNAME: flask-to-es-dev.elasticbeanstalk.com
Once deployment completes, put this CNAME into your web browser and you will find your application.
