This blog post describes how to configure Flask to emit form data to your own personal Gmail account. You don't need to use Gmail, in fact, you can configure Flask to send data to any email account you have access to. This architecture uses Amazon Web Services' (AWS) Simple Email Service (SES). In order to use SES, we simply call the SES Application Programming Interface (API) using the Python boto library in our Flask controller.
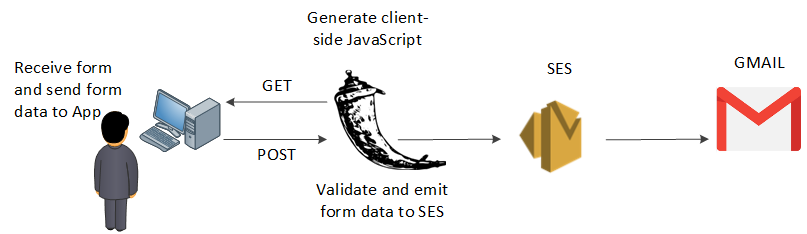
Architecture
The following cartoon captures the system architecture.
The Flask App
This section describes the Web Database application, deployed via the Flask framework.
Flask Model
Consistent with earlier deployments of toy Flask servers, Flask WTF allows us to model the form as a Pythonic object.
The form presents a variety of different form field types to demonstrate validation approaches.
# models.py
from flask_wtf import FlaskForm
from wtforms import BooleanField, IntegerField, StringField, SubmitField, TextAreaField
from wtforms.validators import Email, InputRequired, Length

# Form ORM
class QuizForm(FlaskForm):
  customer_email = StringField('Enter your email address',validators = [Email()])
  qty_beaks = IntegerField('How many Octopus beaks would you like?',validators = [InputRequired()])
  fry_the_beaks = BooleanField('Check here if you would like us to fry the Octopus beak(s)')
  comments =  TextAreaField('Any comments or questions? (2048 characters)', validators=[InputRequired(),Length(max=2047)] )
  submit = SubmitField('Submit')
This example includes validation for a checkbox, an Integer, an Email Address, a text blob and a submit button.
The View
Flask renders views via the Jinja2 template engine.
We configure Jinja2 to use Bootstrap to create pretty forms that include client-side validation.
The WTF provided quick_form() method creates a form element for every object in our model.
{# templates/take_quiz_template.html #}
{% extends "bootstrap/base.html" %}
{% import "bootstrap/wtf.html" as wtf %}
{% block content %}
  <div class="container">
  <title>Octopus Beaks for Sale</title>
  <h3>Order Form</h3>
  <p>Please fill out this form and we will email you a quote.</p>
<hr>
{{ wtf.quick_form(form) }}
<hr>
<p>Copyright 2019 <a href="https://john.soban.ski">John Sobanski</a></p>
</div>
{% endblock %}
The Controller
The controller commands both javascript generation and service routing.
#!/usr/bin/env python
# application.py
from flask import Flask, render_template, request
from flask_bootstrap import Bootstrap
from models import QuizForm

class Config(object):
    SECRET_KEY = '78w0o5tuuGex5Ktk8VvVDF9Pw3jv1MVE'

application = Flask(__name__)
application.config.from_object(Config)

Bootstrap(application)

@application.route('/', methods=['GET', 'POST'])
def take_test():
    form = QuizForm(request.form)
    if not form.validate_on_submit():
        return render_template('take_quiz_template.html', form=form)
    if request.method == 'POST':
        return 'Submitted!'

if __name__ == '__main__':
    application.run(host='0.0.0.0', debug=True)
As we have not yet wired in SES, at this point in time our controller simply validates form data and returns a hello world.
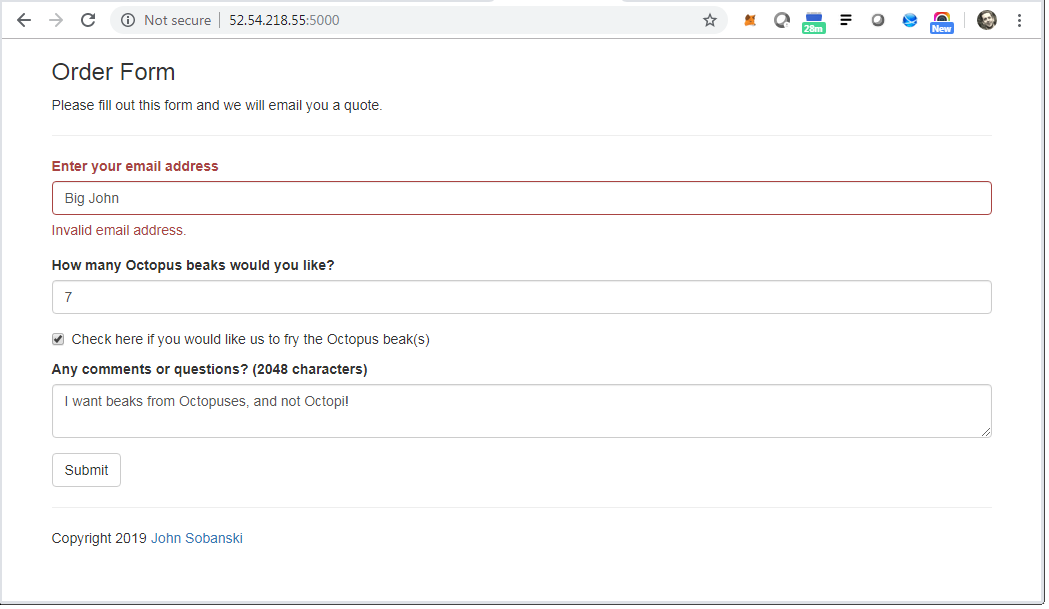
Notice the validation in action in the screencap below.
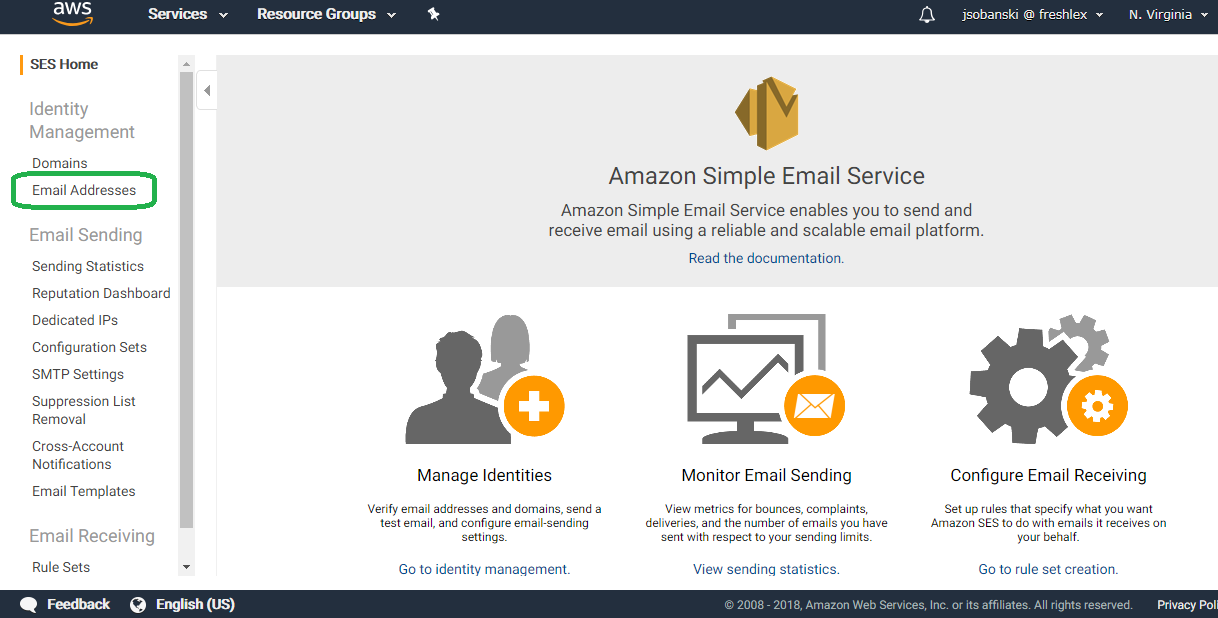
Register an SES account
To use SES you must register an account.
SES allows your Web Database Application to send form data to a Gmail (for example) account.
Open the SES console and click Email Addresses.
Click verify a new email.
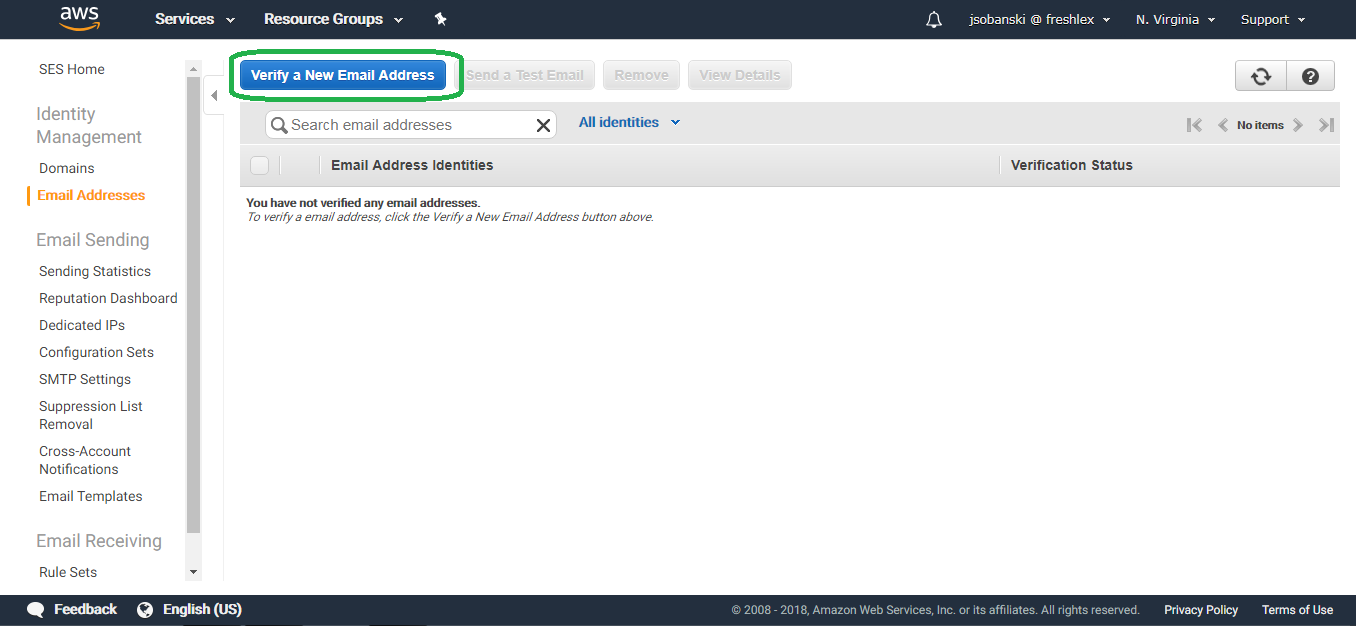
Enter your email address and then go to your inbox.
You will find a verify link in that email.
Click that link.
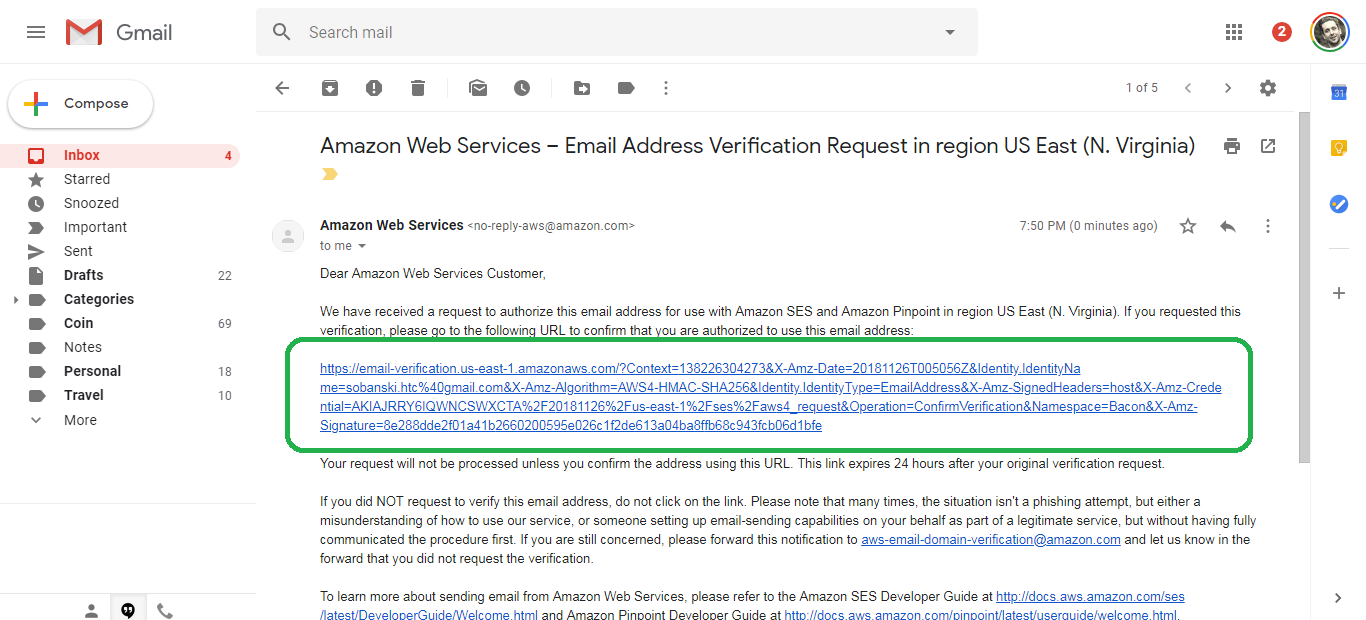
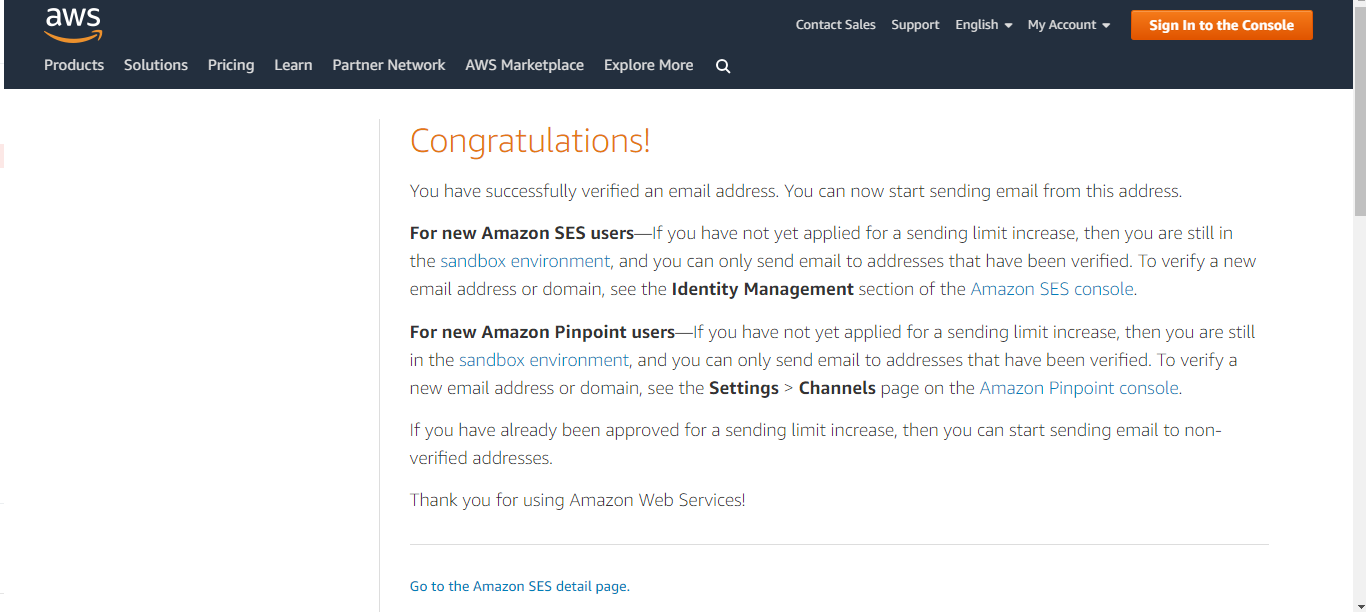
SES reports verification success.
Set up your development environment
This section provides a walk through on how to configure your dev environment to use boto3, which commands SES logic.
Note - for operations, use IAM roles instead of security keys. If you would like to see how to set up IAM roles to enable programmatic access to an AWS API, see here.
First, create a Python virtual environment to sandbox Python libraries.
Python 3 Method
[centos@ip-172-31-1-82 ~]$ python3 -m venv sandbox
Python 2 Method
[centos@ip-172-31-1-82 ~]$ sudo yum -y install python-virtualenv
[centos@ip-172-31-1-82 ~]$ virtualenv sandbox
New python executable in sandbox/bin/python
Installing Setuptools..............................................................................................................................................................................................................................done.
Installing Pip.....................................................................................................................................................................................................................................................................................................................................done.
Now, enter the directory, activate the environment, update PIP and install the required libraries.
[centos@ip-172-31-1-82 ~]$ cd sandbox/
[centos@ip-172-31-1-82 sandbox]$ source ./bin/activate
(sandbox)[centos@ip-172-31-1-82 sandbox]$ pip install -U pip
(sandbox)[centos@ip-172-31-1-82 sandbox]$ pip install boto3 flask_bootstrap flask_wtf
Configure your dev environment with your AWS credentials. This allows you to hit the Elasticsearch index via a script.
(sandbox)[centos@ip-172-31-1-82 ~]$ aws configure
AWS Access Key ID [****************YUTZ]:
AWS Secret Access Key [****************ilBB]:
Default region name [us-east-1]:
Default output format [None]:
(sandbox)[centos@ip-172-31-1-82 ~]$
Update the Application to return HTML
Our Flask application currently returns Success! on Submit.
The SES send_email method allows you to send an HTML portion.
We will use Jinja2 templates to craft our HTML portion.
Copy and paste the following template into your templates folder.
{# templates/pretty_json.html #}
{% extends "bootstrap/base.html" %}
{% import "bootstrap/wtf.html" as wtf %}
{% block content %}
<div class="container">
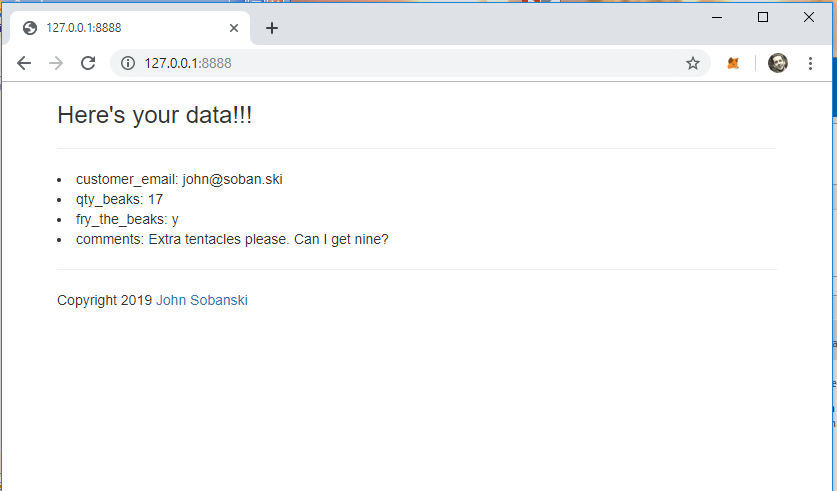
<h3>Here's your data!!!</h3>
<hr>
{% for key in user_json %}
<li>{{ key }}: {{ user_json[key] }}</li>
{% endfor %}
<hr>
<p>Copyright 2019 <a href="https://john.soban.ski">John Sobanski</a></p>
</div>
{% endblock %}
Update the controller to pull form data and pass it to the pretty_json template.
We now return the rendered page on submit to test the template.
@application.route('/', methods=['GET', 'POST'])
def take_test():
  form = QuizForm(request.form)
  if not form.validate_on_submit():
    return render_template('take_quiz_template.html', form=form)
  if request.method == 'POST':
    user_json = {}
    user_json['customer_email'] = request.form.get('customer_email')
    user_json['qty_beaks'] = request.form.get('qty_beaks')
    user_json['fry_the_beaks'] = request.form.get('fry_the_beaks')
    user_json['comments'] = request.form.get('comments')
    return = render_template( 'pretty_json.html', user_json = user_json )
Take the test and you will see dynamic, Jinja2 rendered HTML.
Wire SES into the Application
In application.py make the following edits (full code appears at the bottom of this page).
#!/usr/bin/env python
# application.py

# <-- ADD BOTO LIBRARIES
import boto3, json
from botocore.exceptions import ClientError
# -->

from flask import Flask, render_template, request
from flask_bootstrap import Bootstrap
from models import QuizForm

# <-- ADD SES CONFIG DATA
AWS_REGION = 'us-east-1'
BODY_TEXT = 'You have an order!'
CHARSET = 'UTF-8'
SENDER = 'Your Name <youremail@gmail.com>' # ENTER YOUR NAME and EMAIL
RECIPIENT = 'youremail@gmail.com'          # ENTER YOUR EMAIL
# -->

class Config(object):
  SECRET_KEY = '78w0o5tuuGex5Ktk8VvVDF9Pw3jv1MVE'

application = Flask(__name__)
application.config.from_object(Config)

Bootstrap(application)

# <-- Create SES Client
ses_client = boto3.client('ses',region_name=AWS_REGION)
# -->
Now update your route to craft an EMAIL and then send the message.
We include error checking to catch failed message attempts.
@application.route('/', methods=['GET', 'POST'])
def take_test():
form = QuizForm(request.form)
if not form.validate_on_submit():
return render_template('take_quiz_template.html', form=form)
if request.method == 'POST':
user_json = {}
user_json['customer_email'] = request.form.get('customer_email')
user_json['qty_beaks'] = request.form.get('qty_beaks')
user_json['fry_the_beaks'] = request.form.get('fry_the_beaks')
user_json['comments'] = request.form.get('comments')
SUBJECT = 'Order for {} beak{}'.format(user_json['qty_beaks'], 's.' if int(user_json['qty_beaks']) > 1 else '.')
BODY_HTML = render_template( 'pretty_json.html', user_json = user_json )
try:
response = ses_client.send_email(
Destination = { 'ToAddresses': [ RECIPIENT, ], },
Message={ 'Body': { 'Html': { 'Charset': CHARSET, 'Data': BODY_HTML, },
'Text': { 'Charset': CHARSET, 'Data': BODY_TEXT, }, },
'Subject': { 'Charset': CHARSET, 'Data': SUBJECT, },},
Source=SENDER, )
except ClientError as e:
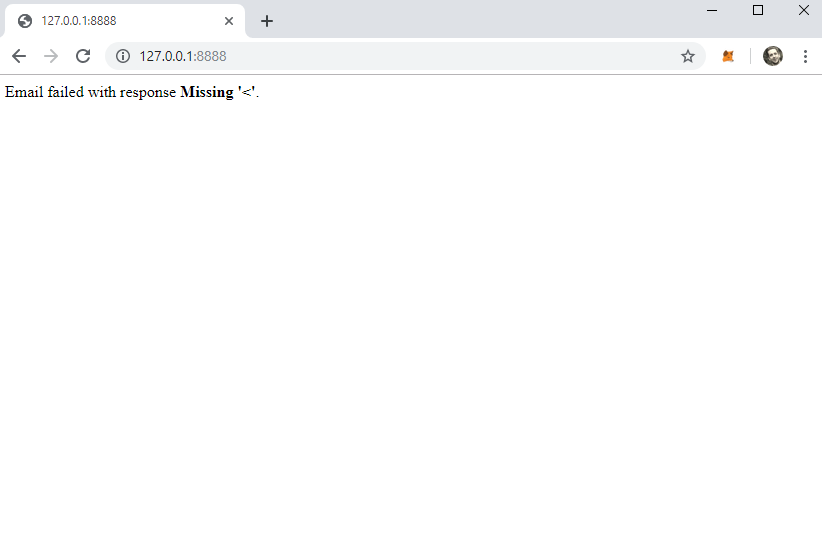
render_msg = 'Email failed with response <b>{}</b>.'.format(e.response['Error']['Message'])
else:
render_msg = 'Email sent! Message ID: <b>{}</b>'.format(response['MessageId'])
return render_msg
Note we use the pretty_json.html template to render the BODY_HTML.
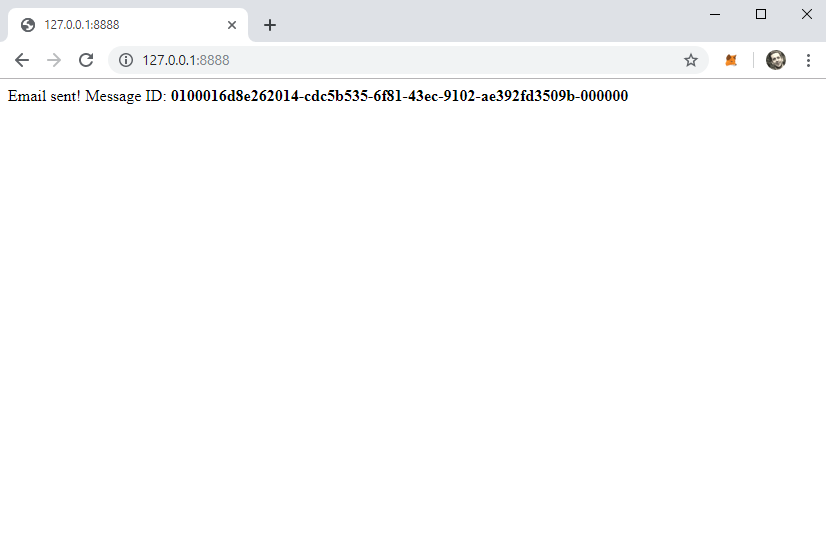
The Web Database Application returns the message status on post, and indicates if it failed or not.
I purposefully malformed my email address, and on submit, the WebDB App alerts the user of this mistake.
After I correct this mistake, I re-submit the form and the Flask app returns a success message, recording the SES Message ID.
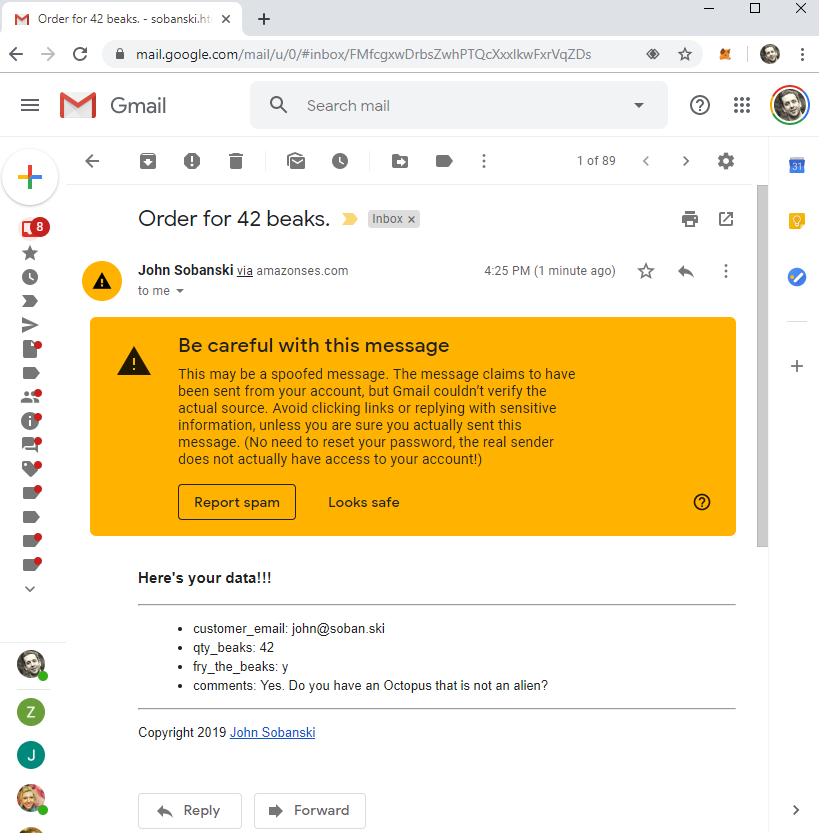
When I go to Gmail, I see my beautiful email, which includes the submitted form data.
Conclusion
This toy application demonstrates how to easily have web users submit form data directly to your GMAIL account via AWS SES.
Full application.py code
#!/usr/bin/env python
# application.py
import boto3, json
from botocore.exceptions import ClientError
from flask import Flask, render_template, request
from flask_bootstrap import Bootstrap
from models import QuizForm

AWS_REGION = 'us-east-1'
BODY_TEXT = 'You have an order!'
CHARSET = 'UTF-8'
SENDER = 'Your Name <youremail@gmail.com>' # ENTER YOUR NAME and EMAIL
RECIPIENT = 'youremail@gmail.com'          # ENTER YOUR EMAIL

class Config(object):
  SECRET_KEY = '78w0o5tuuGex5Ktk8VvVDF9Pw3jv1MVE'

application = Flask(__name__)
application.config.from_object(Config)

Bootstrap(application)

ses_client = boto3.client('ses',region_name=AWS_REGION)

@application.route('/', methods=['GET', 'POST'])
def take_test():
  form = QuizForm(request.form)
  if not form.validate_on_submit():
    return render_template('take_quiz_template.html', form=form)
  if request.method == 'POST':
    user_json = {}
    user_json['customer_email'] = request.form.get('customer_email')
    user_json['qty_beaks'] = request.form.get('qty_beaks')
    user_json['fry_the_beaks'] = request.form.get('fry_the_beaks')
    user_json['comments'] = request.form.get('comments')

    SUBJECT = 'Order for {} beak{}'.format(user_json['qty_beaks'], 's.' if int(user_json['qty_beaks']) > 1 else '.')
    BODY_HTML = render_template( 'pretty_json.html', user_json = user_json )
    try:
      response = ses_client.send_email(
        Destination = { 'ToAddresses': [ RECIPIENT, ], },
        Message={ 'Body': { 'Html': { 'Charset': CHARSET, 'Data': BODY_HTML, },
                            'Text': { 'Charset': CHARSET, 'Data': BODY_TEXT, }, },
                  'Subject': { 'Charset': CHARSET, 'Data': SUBJECT, },},
        Source=SENDER, )
    except ClientError as e:
        render_msg = 'Email failed with response <b>{}</b>.'.format(e.response['Error']['Message'])
    else:
        render_msg = 'Email sent!  Message ID: <b>{}</b>'.format(response['MessageId'])
    return render_msg

if __name__ == '__main__':
  application.run(host='0.0.0.0', debug=True)