All production databases require backups. The AWS Elasticsearch documentation states:
Amazon Elasticsearch Service (Amazon ES) takes daily automated snapshots of the primary index shards in an Amazon ES domain... However, you must contact the AWS Support team to restore an Amazon ES domain with an automated snapshot. If you need greater flexibility, you can take snapshots manually and manage them in a snapshot repository, an Amazon S3 bucket.
After this text, the Amazon documentation provides detailed descriptions of the ingredients necessary to create a snapshot, but not a simple to follow recipe. In this HOWTO I present a clear, easy to follow, step-by-step guide.
NOTE: Click here to find an update to this blog post which uses Boto3 and Elasticsearch 7.X
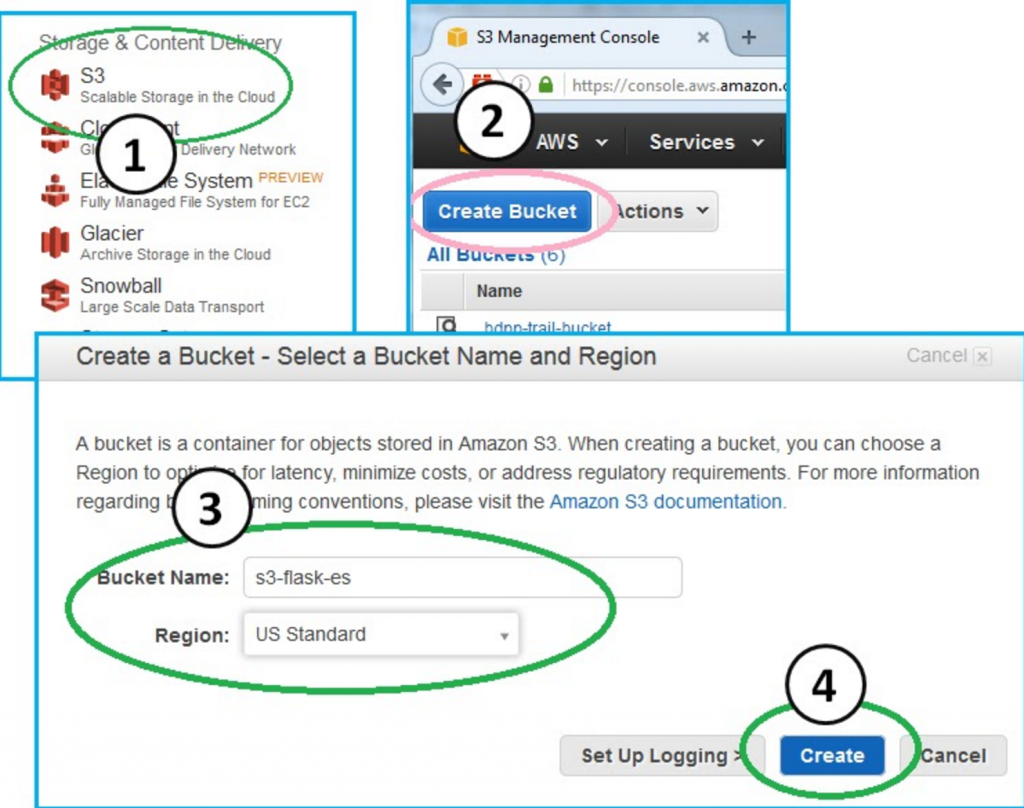
Step 1. Create a bucket:
In order to backup to a bucket, you need to create a bucket. From the Amazon console, click S3 --> Create Bucket and then enter a bucket name. I named mine s3-flask-es. Pick a Region if you care and then click "create."
2. Create an S3 CRUD policy
In HOWTO-1 we created the EC2_Can_Use_Services role and then created a policy that allows services on our EC2 instance to Create, Retrieve Update and Delete (CRUD) documents in our Elasticsearch document store. We attached this Can_CRUD_Elasticsearch policy to our EC2_Can_Use_Services role. In this HOWTO, we will create a new policy to let our services CRUD AWS Simple Storage Service (S3) buckets.
Go to the main AWS console and then click the following tree to create a new policy.
Console --> IAM --> Policies --> Create Policy --> Create Your Own Policy
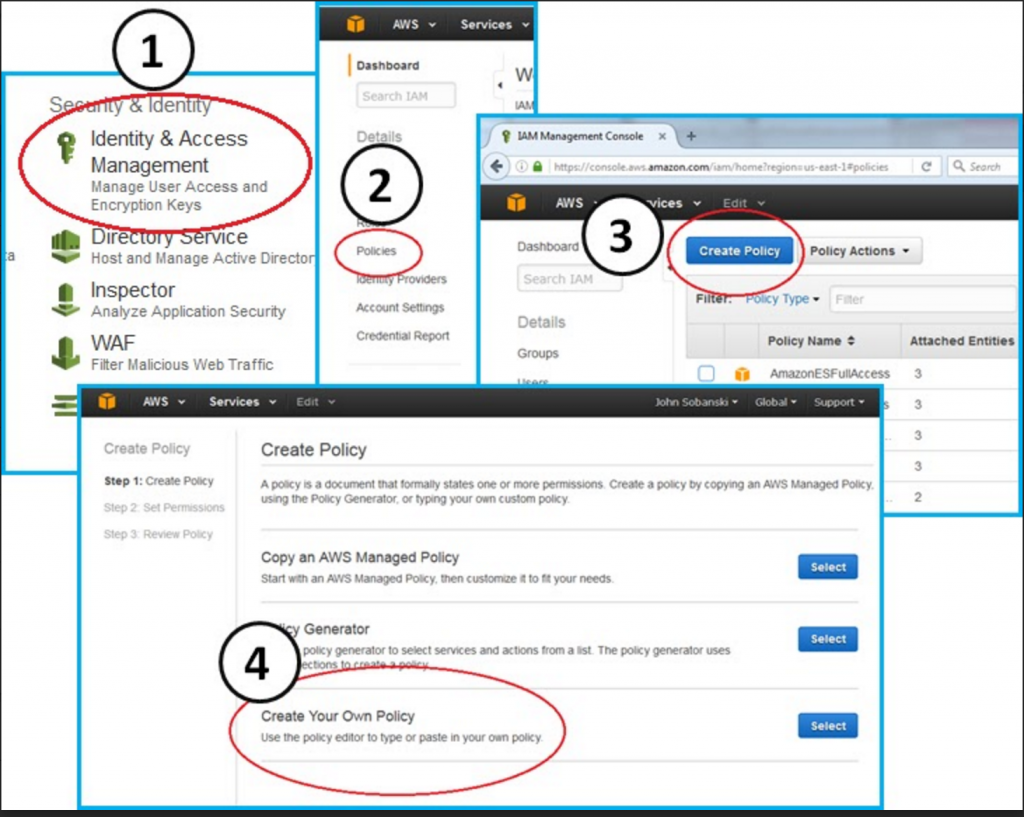
Copy and paste the following JavaScript Object Notation (JSON) text into the "Create Your Own Policy" text box.
{
    "Version": "2012-10-17",
    "Statement": [
        {
            "Effect": "Allow",
            "Action": [
                "s3:DeleteObject",
                "s3:GetObject",
                "s3:ListBucket",
                "s3:PutObject",
                "iam:PassRole"
            ],
            "Resource": [
                "arn:aws:s3:::s3-flask-es",
                "arn:aws:s3:::s3-flask-es/*"
            ]
        }
    ]
}
Validate the policy and fix any copy and paste errors. Then, click "Create the Policy."
Our IAM role must have a trust relationship with the Amazon Elasticsearch service. We already configured EC2_Can_Use_Services in HOWTO-1 to have a trust role with the Elasticsearch service. You can look at the trust role to verify:
Click through the following tree:
Console --> IAM --> Roles --> EC2_Can_Use_Services --> Trust Relationships (Tab)
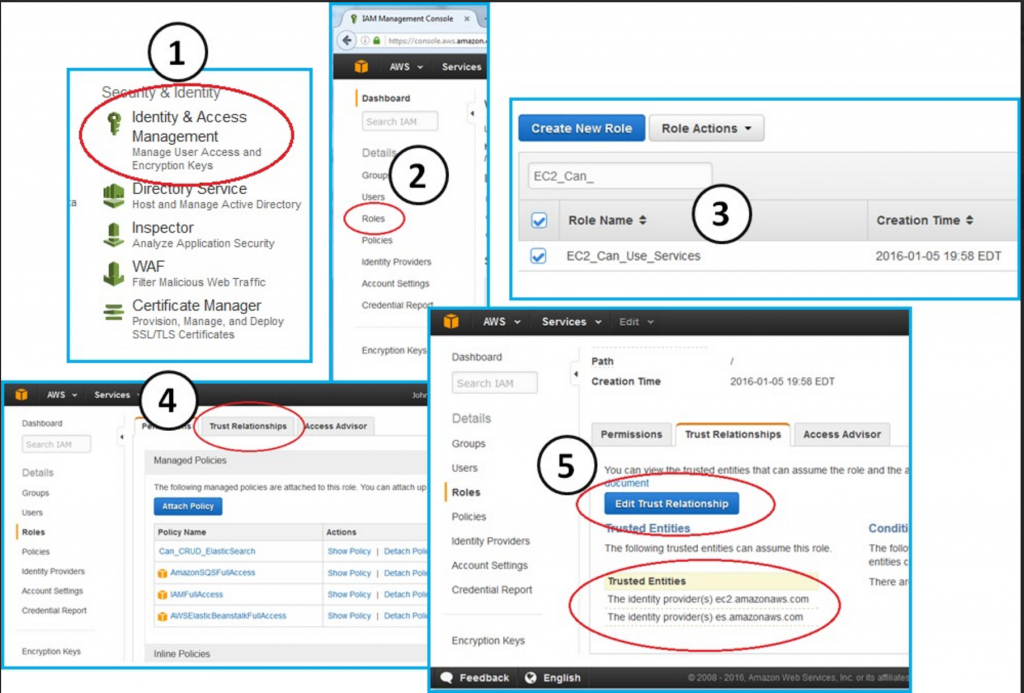
You will see the following JSON:
{
  "Version": "2012-10-17",
  "Statement": [
    {
      "Effect": "Allow",
      "Principal": {
        "Service": [
          "ec2.amazonaws.com",
          "es.amazonaws.com"
        ]
      },
      "Action": "sts:AssumeRole"
    }
  ]
}
With the trust role in place, a Python script on our EC2 instance can now "delegate" an IAM role to a service. In non jargon-terms, we use a one-time command line script to tell our AWS Elasticsearch service to use S3.
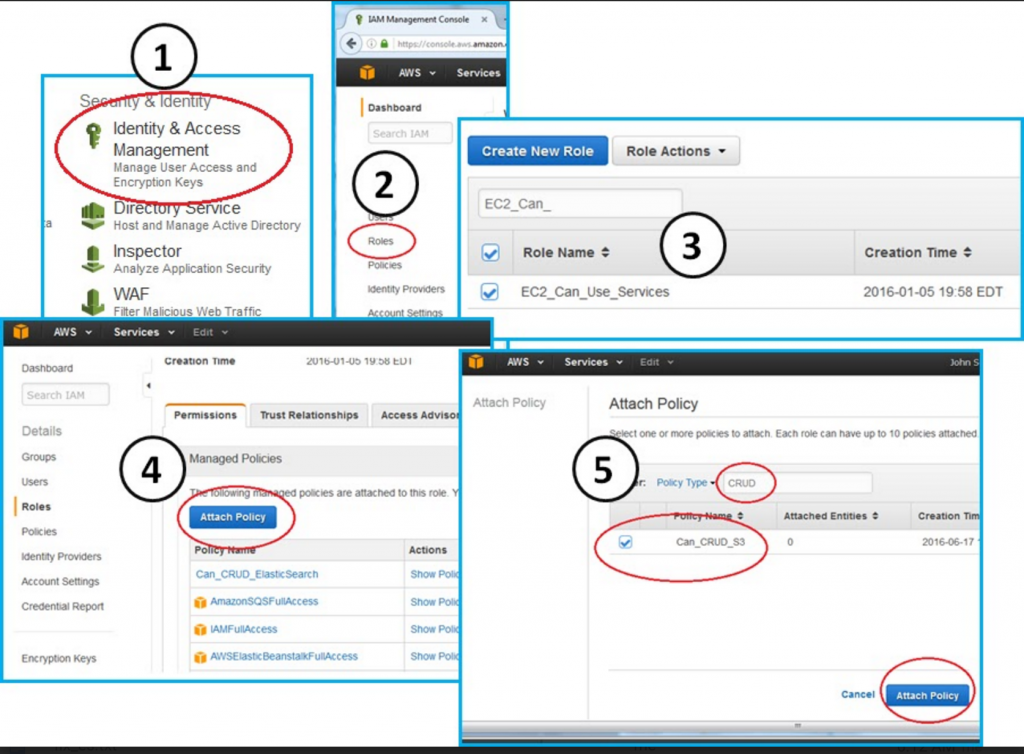
We need to first attach the Can_CRUD_S3 policy to our EC2_Can_Use_Services role. After we attach this policy, we pass it to Elasticsearch.
Click through the following tree to attach our new policy to our existing role.
Console --> IAM --> Roles --> EC2_Can_Use_Services --> Attach Policy --> Attach Can_CRUD_S3
3. Pass ability to CRUD S3 to Elasticsearch
In this section we give Elasticsearch the ability to CRUD S3. We have an EC2 instance with a role that includes a policy to CRUD S3. We will now execute a Python script to pass the IAM role (and S3 CRUD policy) to Elasticsearch.
NOTE: We cannot use the Amazon console GUI to attach a policy to the AWS Elasticsearch service. Instead, we must:
1. Create an EC2 IAM role
2. Create a policy and attach it to the role
3. Create a trust relationship between the role and Elasticsearch.
4. Pass the role to Elasticsearch via a one time, signed REST request.
The AWS procedure to back up ES to S3 includes the following text:
You cannot use curl to perform this operation because it does not support AWS request signing. Instead, use the sample Python client to register your snapshot directory.
This statement stops the legion of wannabee coders dead in their tracks. Since we are professional developers, however, this statement is irrelevant to us. Since HOWTO-1 we have used IAM roles to abstract request signing. We don't need to worry about hard-coding or accounting credentials, we took the time to do things right up front. As a result, we execute the role pass operation with no roadblocks.
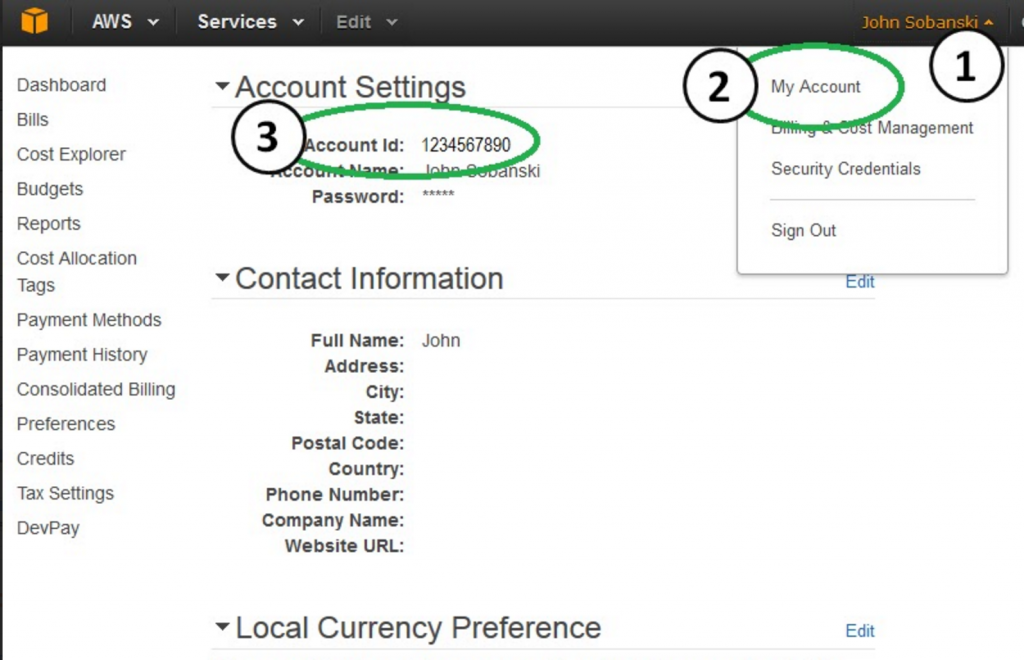
All you need to do is locate your ARN and remember the name of the S3 bucket you created in step one. To find your ARN, go to the AWS console, click your name, click "My Account" and then look for your 'Account ID':
Now activate your virtual environment (notice, the 'bang dot' shortcut should work for you).
ubuntu@ip-172-31-34-189:~$ cd flask_to_es/
ubuntu@ip-172-31-34-189:~/flask_to_es$ !.
. bin/activate
(flask_to_es)ubuntu@ip-172-31-34-189:~/flask_to_es$ vim register_snapshot.py
Create the following python script.
# register_snapshot.py
from boto.connection import AWSAuthConnection

class ESConnection(AWSAuthConnection):

    def __init__(self, region, **kwargs):
        super(ESConnection, self).__init__(**kwargs)
        self._set_auth_region_name(region)
        self._set_auth_service_name("es")

    def _required_auth_capability(self):
        return ['hmac-v4']

if __name__ == "__main__":

    client = ESConnection(
            region='us-east-1',
            # Be sure to put the URL for your Elasticsearch endpoint below!
            host='search-test-domain-ircp547akjoolsbp4ehu2a56u4.us-east-1.es.amazonaws.com',
            is_secure=False)

    print 'Registering Snapshot Repository'
    resp = client.make_request(method='POST',
            # Change "s3-flask-es" below to the name of your bucket
            path='/_snapshot/s3-flask-es',
            # Be sure to use your ARN below
            data='{"type": "s3","settings": { "bucket": "s3-flask-es","region": "us-east-1","role_arn": "arn:aws:iam::<your_ARN>:role/EC2_Can_Use_Services"}}')
    body = resp.read()
    print body
Execute the Python script. This passes your Jumpbox's credentials to the Elasticsearch service. The Elasticsearch service can now send snapshots to your S3 buckets. When you execute the "register_snapshot" Python script, you will see the following success.
(flask_to_es)ubuntu@ip-172-31-34-189:~/flask_to_es$ python register_snapshot.py
{"accepted":true}
(flask_to_es)ubuntu@ip-172-31-34-189:~/flask_to_es$
If you didn't see success, then double check you have the correct ES endpoint (no spaces), ARN and bucket name in your Python script. Please list any gotchas in the comments below, in case another reader witnesses the same error.
4. Take a snapshot
We will trigger the Elasticsearch snapshot (backup) with the following Python script. Feel free to modify the script to create a menu or parameterize the execution logic. For now, we will just comment and un-comment lines as needed. Again, ensure that you replace the code below with your Elasticsearch endpoint and rename the bucket name to match your bucket name (I named mine 's3-flask-es').
from boto.connection import AWSAuthConnection

class ESConnection(AWSAuthConnection):

    def __init__(self, region, **kwargs):
        super(ESConnection, self).__init__(**kwargs)
        self._set_auth_region_name(region)
        self._set_auth_service_name("es")

    def _required_auth_capability(self):
        return ['hmac-v4']

if __name__ == "__main__":
    client = ESConnection(
            region='us-east-1',
            # Be sure to put in the endpoint for your ES domain below
            host='search-test-domain-ircp547akjoolsbp4ehu2a56u4.us-east-1.es.amazonaws.com',
            is_secure=False)

    resp = client.make_request(method='PUT',path='/_snapshot/s3-flask-es/18jun16')
    #resp = client.make_request(method='DELETE',path='/big_survey')
    #resp = client.make_request(method='POST',path='/_snapshot/s3-flask-es/18jun16/_restore')
    print resp.read()
HOT TIP: Snapshot names must be lowercase in the url. You can use /18jun16/_restore but not /18JUN16/_restore
Run the script to take a snapshot:
(flask_to_es)ubuntu@ip-172-31-34-189:~/flask_to_es$ python take_snapshot.py
{"accepted":true}
(flask_to_es)ubuntu@ip-172-31-34-189:~/flask_to_es$
Now, take a look at your S3 bucket:
Console --> S3 --> s3-flask-es: (Snapshot of the Metadata)
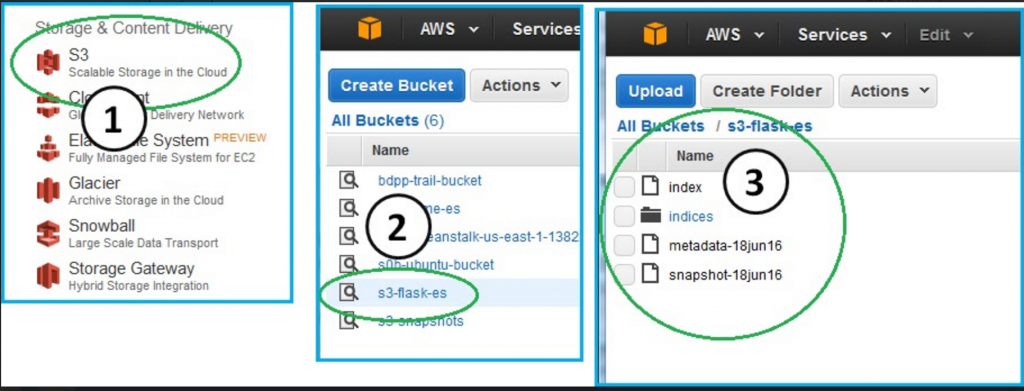 You see that Elasticsearch populated your bucket with a snapshot of your Elasticsearch document store.
Feeling tough? Then let's comment the "snapshot" line and uncomment the "delete" line in take_snapshot.py
    #resp = client.make_request(method='PUT',path='/_snapshot/s3-flask-es/18jun16')
    resp = client.make_request(method='DELETE',path='/big_survey')
    #resp = client.make_request(method='POST',path='/_snapshot/s3-flask-es/18jun16/_restore')
Run the Python script.
(flask_to_es)ubuntu@ip-172-31-34-189:~/flask_to_es$ python take_snapshot.py
{"acknowledged":true}
(flask_to_es)ubuntu@ip-172-31-34-189:~/flask_to_es$
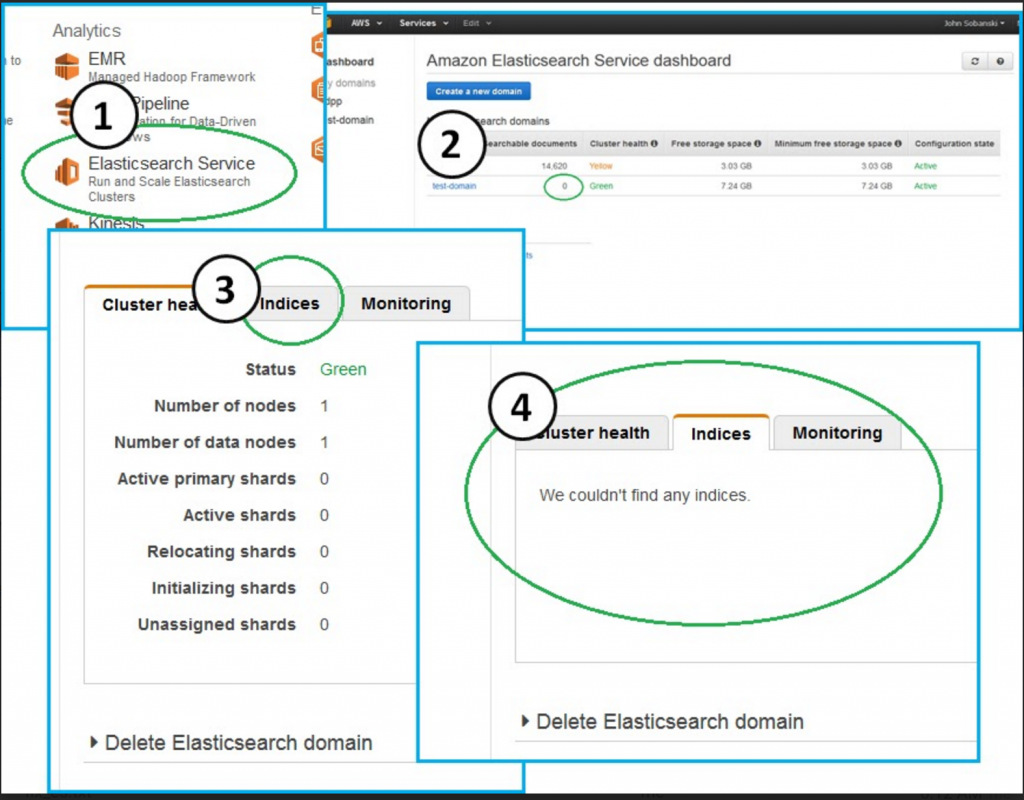
Did you notice a difference in the response? If you said "Acknowledged" vs. "Accepted" then congrats, you have Jason Bourne levels of observation. If you go to your ES endpoint, you will no longer see "big_survey:"
Console --> Elasticsearch Service --> test-domain --> Indicies (Tab)
Do you want to bring it back from the dead like Doc Martens, Flannels and the Undercut hairstyle? To bring back the Document store, edit your "Take Snapshot" Python script. Comment the "delete" line and un-comment the "POST" (_restore) line:
    #resp = client.make_request(method='PUT',path='/_snapshot/s3-flask-es/18jun16')
    #resp = client.make_request(method='DELETE',path='/big_survey')
    resp = client.make_request(method='POST',path='/_snapshot/s3-flask-es/18jun16/_restore')
Again, you will see "accepted" = True.
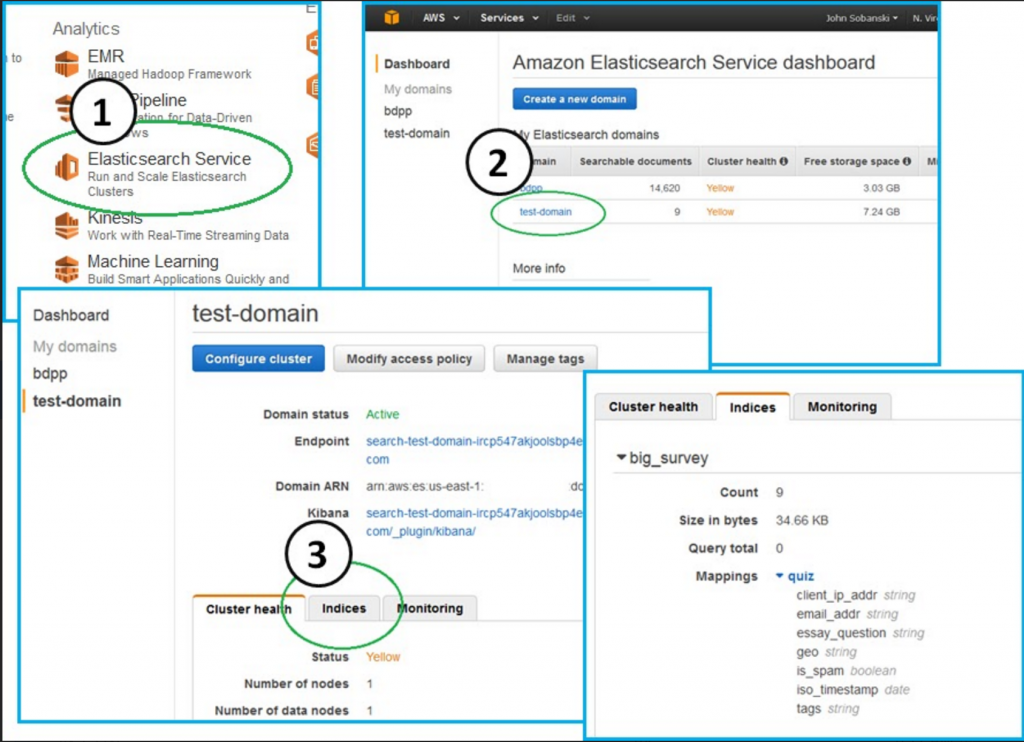
Now, refresh the indicies tab on your ES console: big_survey returned from the dead!
In the next blog post we will use the snapshot feature to "save our work" before we update the mappings of our Document properties.