InfluxDB provides an exciting Time Series database with tons of industry momentum and enthusiasm behind it. InfluxData, the parent company that distributes the product overhauled the classic InfluxDB service with their new InfluxDB 2.0 offering. InfluxDB 2.0 provides new features, to include an integrated configuration and operations console, a new token based security layer, native alerts, native job scheduling and a new pipe forward operated query language (FLUX).
The classic 1.X InfluxDB service provides a Python library that enables Create, Retrieve Update and Delete (CRUD) operations via Python models. You may have used this library in the past to command InfluxDB. In this blog post I will walk through an Influx Provided test script and modify it for InfluxDB 2.0 compatibility. I will also walk through the install procedure for InfluxDB 2.0.
Installing InfluxDB 2.0
Introduction
This section walks through an on-premise installation of InfluxDB 2.0. You can alternatively use their cloud offering, which provides a free, rate-limited option. I wrote about this cloud service in a previous blog post, named Deploy a Personal Kraken Exchange Terminal to InfluxDB Cloud 2.0.
The on premise version of InfluxDB 2.0 provides an integrated Time Series database platform with useful features:
- A free and Open Source version, or an enterprise license option (with support and clustering)
- A unified API for ingest, queries, storage and plots.
- A functional fourth generation analytic programming language (Flux)
- Integrated control panel and data viz dashboards
- Quick on boarding
![]()
InfluxDB 2.0 Configuration
Download the Source
As of August 2019, InfluxData does not yet provide an RPM for InfluxDB 2.0.
Download the binary and then unzip it.
[~]$ curl -XGET https://dl.influxdata.com/influxdb/releases/influxdb_2.0.0-alpha.17_linux_amd64.tar.gz -O
[~]$ tar -xzvf influxdb_2.0.0-alpha.17_linux_amd64.tar.gz
influxdb_2.0.0-alpha.17_linux_amd64/LICENSE
influxdb_2.0.0-alpha.17_linux_amd64/README.md
influxdb_2.0.0-alpha.17_linux_amd64/influx
influxdb_2.0.0-alpha.17_linux_amd64/influxd
Start the Service
Enter the directory and start the service.
[~]$ cd influxdb_2.0.0-alpha.17_linux_amd64
[influxdb_2.0.0-alpha.17_linux_amd64]$ influxd
Configure your Service
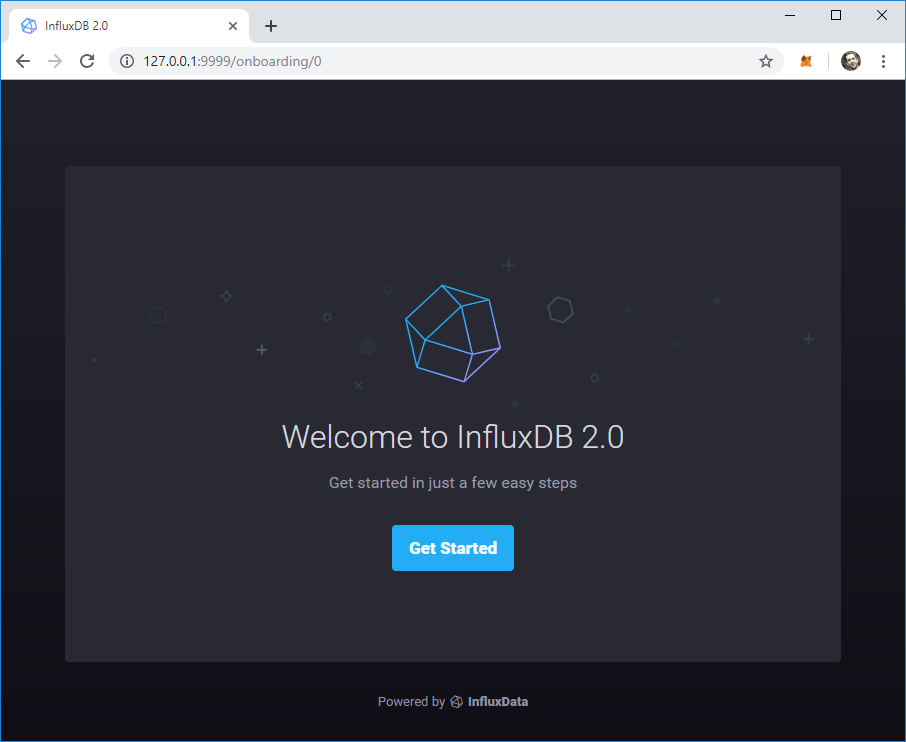
Navigate to
You will be greeted with the following splash page.
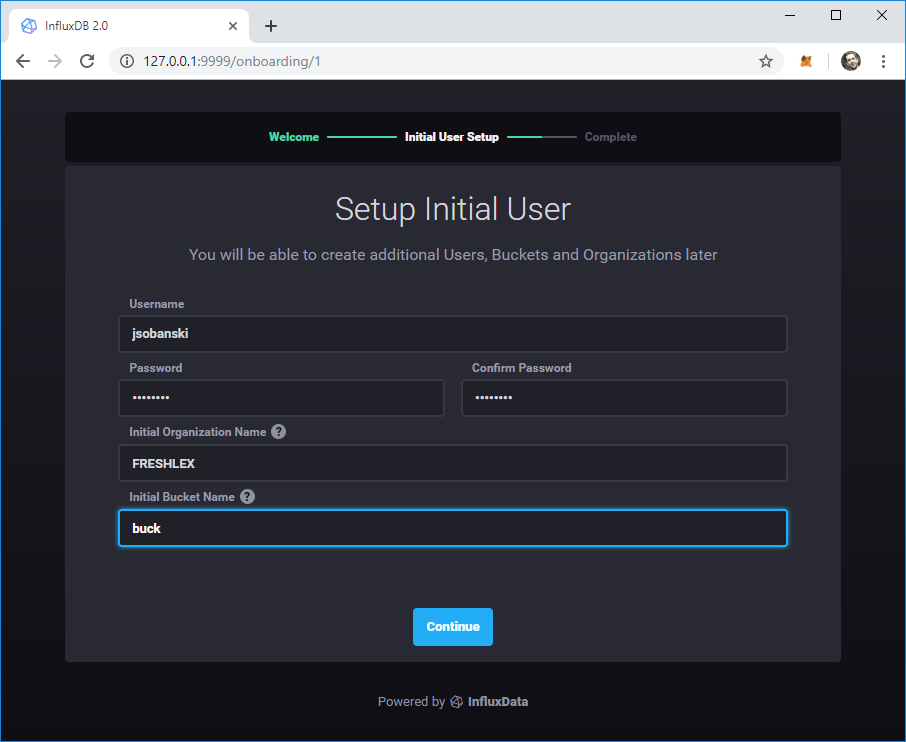
Enter a user name, password, organization and bucket name.
I use the following parameters
- username: jsobanski
- password: password
- org name: FRESHLEX
- bucket name: buck
You will use these parameters (less the password) to access a bucket via the Python API.
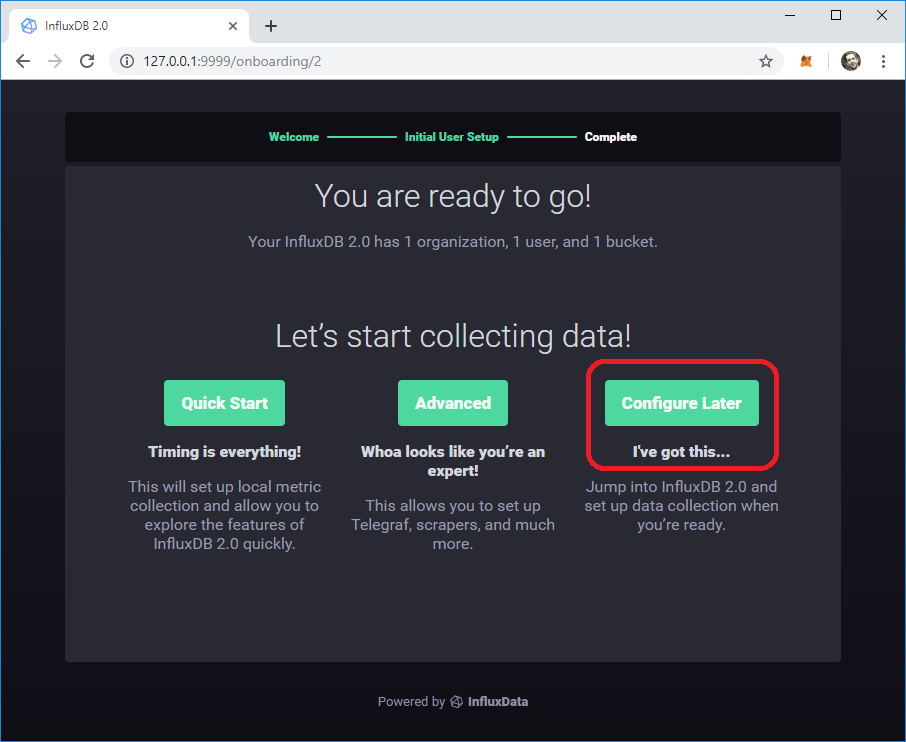
Now click Configure Later.
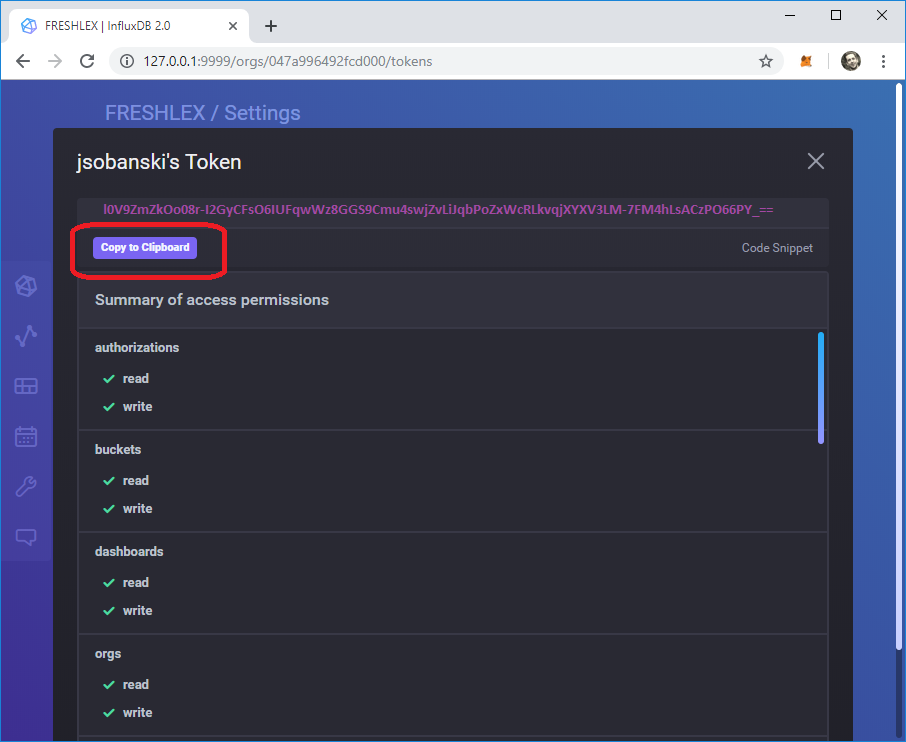
Get your API token
The API token enables access via REST calls.
Click settings --> tokens --> \<your user name>'s token.
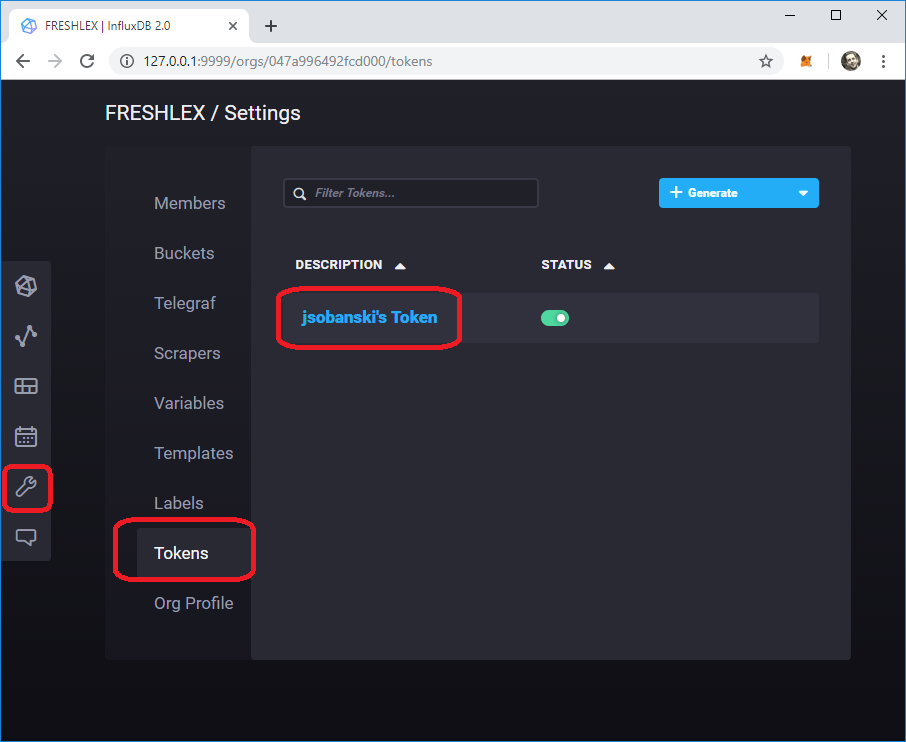
Copy token to clipboard.
Click Copy to Clipboard and paste this eighty-eight (88) byte token into a local text file for later use.
In the graphic below, I replaced my actual token with a randomly generated string.
Refactor 1.X Code
Noah Crowley wrote a blog post that demonstrates the Python API client in action.
He provides a script along with a walk-through of the code, collected here.
Put Data
Let's PUT some data trying the existing write_test.py script.
The write_test.py script generates some data.
We can inspect the data in line protocol using a Python shell.
[~]$ bpython
bpython version 0.18 on top of Python 3.6.8 /home/ec2-user/venv3/bin/python36
>>> from write_test import data
>>> print( '\n'.join( data[1:5] ) )
m1,location=hospital,fruit=lemon,id=20d64354-f715-4191-8dce-170e9d7eae18 x=0.5353,y=0.4124,z=32i 1569090200
m1,location=office,fruit=passionfruit,id=a4e6969d-c0be-4bb9-a4f0-3010131dd986 x=0.4748,y=0.0787,z=8i 1569090201
m1,location=bakery,fruit=papaya,id=cc0f6b5f-58be-4bfe-9433-9ff2daad5d38 x=0.617,y=0.7414,z=12i 1569090202
m1,location=delicatessen,fruit=banana,id=2051ac2c-002a-462d-a46c-a717ae3449ea x=0.2144,y=0.9508,z=5i 1569090203
The script creates a measurement named m1, a tag_set that includes location, fruit and id, a field_set that includes fields x, y and z, and a timestamp.
Note that the wire protocol deliminates the tag_set, field_set and timestamp via whitespace.
When we execute the script, we get the following error.
[~]$ write_test.py
...
ConnectionRefusedError: [Errno 111] Connection refused
Inspecting the script, we see that the script uses the old 1.7 API port and does not point to a bucket.
client = InfluxDBClient(host='localhost', port=8086)
client.create_database('writetest')
We will refactor the code to use the new 2.0 API port, and accommodate the new ORG and BUCKET ecosystem.
INFLUX_URL='127.0.0.1'
ORG='FRESHLEX'
BUCKET_NAME='buck'
We then use these parameters to create the INFLUXDB_HOST.
INFLUXDB_HOST='{}/api/v2/write?org={}&bucket={}&precision=ms'.format(INFLUX_URL,ORG,BUCKET_NAME)
I would like to take a shot and pass this new host to the python script, so I edit the client to instantiate as follows:
client = InfluxDBClient(host=INFLUXDB_HOST, port=9999)
#client.create_database('writetest')
The script errors out, since the InfluxDBClient object appends the port to the end of the URL.
[~]$ write_test.py
...
urllib3.exceptions.MaxRetryError: HTTPConnectionPool(host='127.0.0.1', port=80): Max retries exceeded with url: /api/v2/write?org=FRESHLEX&bucket=buck&precision=ms:9999/write&db=writetest&precision=ms (Caused by NewConnectionError('<urllib3.connection.HTTPConnection object at 0x7f7e9b95cba8>: Failed to establish a new connection: [Errno 111] Connection refused',))
Let's update the URL and put the port in its proper place.
INFLUXDB_HOST='{}:9999/api/v2/write?org={}&bucket={}&precision=ms'.format(INFLUX_URL,ORG,BUCKET_NAME)

client = InfluxDBClient(host=INFLUXDB_HOST, port=9999)
#client.create_database('writetest')
When we execute the script, InfluxDB reports unauthorized access.
[~]$ write_test.py
...
influxdb.exceptions.InfluxDBClientError: 401: {"code":"unauthorized","message":"unauthorized access"}
The InfluxDB 2.0 API requires a client to provide a TOKEN in order to access a BUCKET.
We do not want to pass this TOKEN in the URL (since anyone can just sniff it off the URL), so we need to take another approach.
Since InfluxDB provides a REST API, we can add the TOKEN to the HTTP headers, vice passing it in a URL.
Note: This toy server uses HTTP and therefore a hacker could easily retrieve the headers. In production, you would use HTTPS, which encrypts the headers.
The Python requests library allows us to send an authentication TOKEN via headers.
BUCKET_NAME='buck'
INFLUX_URL='127.0.0.1'
ORG='FRESHLEX'
QUERY_URI='http://{}:9999/api/v2/write?org={}&bucket={}&precision=ms'.format(INFLUX_URL,ORG,BUCKET_NAME)
INFLUX_TOKEN='Your 88 Character Key' #Put your INFLUX KEY here
headers = {}
headers['Authorization'] = 'Token {}'.format(INFLUX_TOKEN)
We now modify the code to use requests instead of the 1.7 InfluxDB client.
Replace:
client.write_points(data, database='writetest', time_precision='ms', batch_size=10000, protocol='line')
..with the following code (we send one point to try it out).
import requests
r = requests.post(QUERY_URI, data=data[0], headers=headers)
print( r.status_code )
You should see a 204, which means InfluxDB stored the data point, with no response.
Batch Data
The original InfluxDB client includes a write_points method, that batches the posts.
We can send multiple data a points at once by newline separating them.
The following code sends five points at once.
r = requests.post(QUERY_URI, data='\n'.join( data[0:5] ), headers=headers)
We can set batch sizes and total points set using the following logic.
number_of_points = 10000
batch_size = 1000

# First check to ensure that batch_size factors into number_of_points
if (  number_of_points % batch_size != 0 ):
    raise SystemExit( 'Number of points must be divisible by batch size' )

# Newline delimit the data
for batch in range(0, len(data), batch_size):
  current_batch = '\n'.join( data[batch:batch + batch_size] )
  r = requests.post(QUERY_URI, data=current_batch, headers=headers)
  print(r.status_code)
Run this and you will see a 204 (Success) for each batch.
This simple example shows how to emulate the 1.7 write_points method in 2.0 using requests.
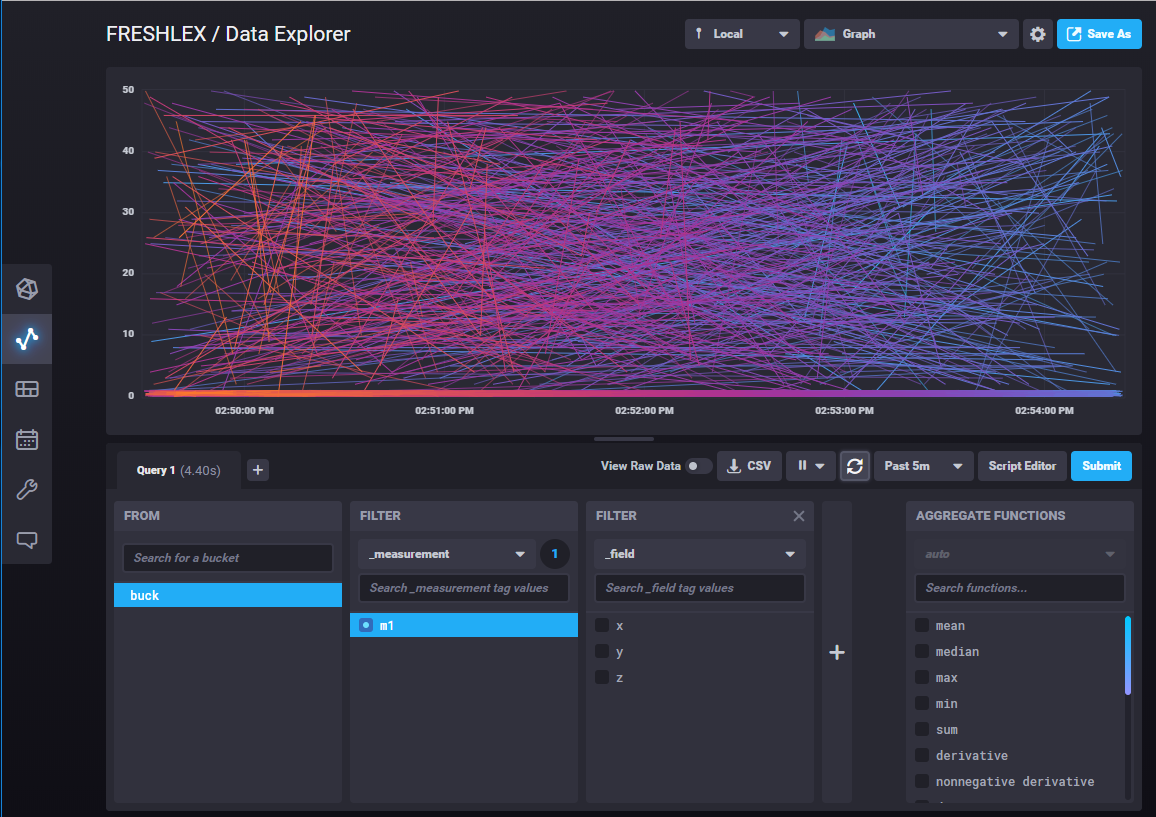
If you go to your InfluxDB 2.0 console, you will see your points!
Code
The full, refactored code follows:
#!/usr/bin/python
import requests
import uuid
import random
import time
import sys

INFLUX_TOKEN='Your 88 Character Token!'
ORG="FRESHLEX"
INFLUX_CLOUD_URL='127.0.0.1'
BUCKET_NAME='buck'

# Be sure to set precision to ms, not s
QUERY_URI='http://{}:9999/api/v2/write?org={}&bucket={}&precision=ms'.format(INFLUX_CLOUD_URL,ORG,BUCKET_NAME)

headers = {}
headers['Authorization'] = 'Token {}'.format(INFLUX_TOKEN)

measurement_name = 'm1'
# Increase the points, 2, 10 etc.
number_of_points = 100000
batch_size = 1000

data_end_time = int(time.time() * 1000) #milliseconds

location_tags = [ "reservoir","orchard","vineyard","quarry","hospital","bakery","warehouse","outhouse","restaurant","cafeteria","delicatessen","office"]

fruit_tags = [ "apple","banana","cantaloupe","cherry","coconut","durian","fig","gooseberry","grape","grapefruit","guava","lemon","lime","lychee","mango","papaya","passionfruit","peach","pineapple","plum","strawberry","tangerine","tomato","watermelon"]

id_tags = []
for i in range(100):
    id_tags.append(str(uuid.uuid4()))

data = []
data.append("{measurement},location={location},fruit={fruit},id={id} x={x},y={y},z={z}i {timestamp}"
            .format(measurement=measurement_name, location=random.choice(location_tags), fruit=random.choice(fruit_tags), id=random.choice(id_tags), x=round(random.random(),4), y=round(random.random(),4), z=random.randint(0,50),timestamp=data_end_time))

current_point_time = data_end_time

for i in range(number_of_points-1):
    current_point_time = current_point_time - random.randint(1,100)
    data.append("{measurement},location={location},fruit={fruit},id={id} x={x},y={y},z={z}i {timestamp}"
                .format(measurement=measurement_name, location=random.choice(location_tags), fruit=random.choice(fruit_tags), id=random.choice(id_tags), x=round(random.random(),4), y=round(random.random(),4), z=random.randint(0,50), timestamp=current_point_time))

if __name__ == '__main__':
  # Check to see if number of points factors into batch size
  if (  number_of_points % batch_size != 0 ):
    raise SystemExit( 'Number of points must be divisible by batch size' )
  # Newline delimit the data
  for batch in range(0, len(data), batch_size):
    current_batch = '\n'.join( data[batch:batch + batch_size] )
    r = requests.post(QUERY_URI, data=current_batch, headers=headers)
    print(r.status_code)