OpenDaylight allows network engineers to control switches with high level intelligence and abstracted services. Before Ravello, your engineers needed to deploy physical switches or use Mininet in order to integrate and test OpenDaylight. Neither AWS, Google Cloud, nor Azure provide native access to layer two (Ethernet, VLAN, LLDP, etc.) in the cloud. Ravello, however, provides a simple method to access Layer 2 (L2) services in the cloud. This lab will show you or your engineers how to integrate and test OpenDaylight in the cloud, using full Virtual Machines (VM) instead of Mininet containers.
In this blog post you will learn how to:
- Connect virtual machines to a dedicated virtual switch VM in the cloud with Ravello
- Deploy and configure OpenDaylight
- Use a REST API to configure your network switch
- Easily steer flows through a firewall on ingress, but bypass on egress using OpenDaylight
Note: I wrote this blog post in 2015. Ravello Systems originally published this in 2015. Ravello no longer hosts a website so I post it here for posterity.
Scenario
You have a product distribution system where egress throughput greatly exceeds ingress throughput. For security reasons, you perform Deep Packet Inspection (DPI) on flows between external (EXT) hosts and your Demilitarized Zone (DMZ) proxies.
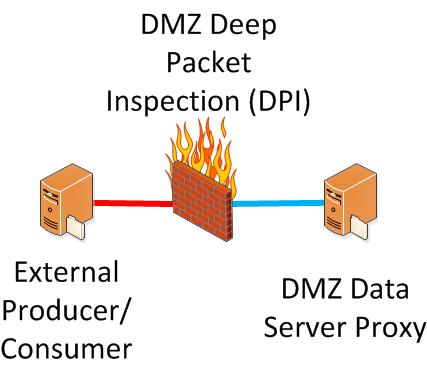
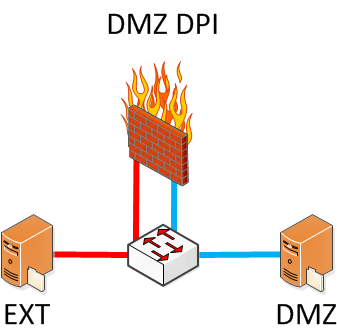
To ensure internetwork communications pass through the DPI, you implement a DPI "router on a stick" where a switch "bent pipes" the traffic at L2.
The egress traffic will increase past the capacity of the DPI appliance.
You realize that there are cheaper methods of securing your egress flows than upgrading to a bigger DPI appliance.
With egress flows you want to ensure that return/ACK traffic does not include exploits and that egress flows do not facilitate zombies or “phone home” exploits.
Some ideas:
- Ensure only approved ports:
- Access Control List (ACL)
- Iptables
- Host firewalls
- Mitigate against malicious code over approved ports:
- HIDS on Servers
- Uni-directional bulk data push with Error Detection and Correction over one way fiber
- TLS with X.509 certificates
You would like to have DPI inspection on ingress flows, but not egress, since the other security measures will cover the egress flows.
- One approach is to add "don't scan egress flows" logic to your DPI appliance, but that wastes capacity/resources and could saturate the backplane
- An approach with legacy Network protocols is very difficult to implement, and results in asymmetric routes (i.e., will break things)
- Using OpenDaylight, we have a simple solution that only requires matches/actions on six (6) flows
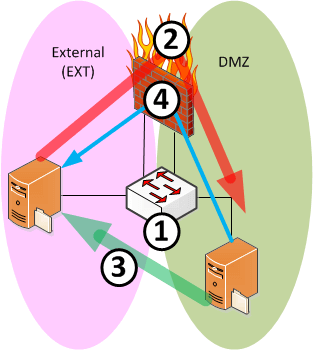
The goal:
- When EXT initiates, pass through DPI
- When DMZ initiates:
- Bypass DPI on PUT (egress)
- Scan on GET (ingress)
Here is the logic for our OpenFlow rule set:
- ACL only allows permitted flows
- For ingress (EXT -> DMZ) flows, allow normal path to virus scan via gateway
- For egress (DMZ -> EXT) PUT flows, intercept packet
- Change destination MAC from gateway to EXT
- Change destination Port from gateway to EXT
- Decrement TTL by one
- For egress (DMZ -> EXT) GET flows (treat as ingress)
- DMZ uses dummy IP for EXT server
- Switch intercepts packet
- Switch changes source IP to dummy DMZ address
- Switch changes destination IP to correct EXT IP
- Packet continues on its way to gateway
- Reverse logic for return traffic
Lab Setup
This setup goes into the details of our test bed architecture.
Architecture
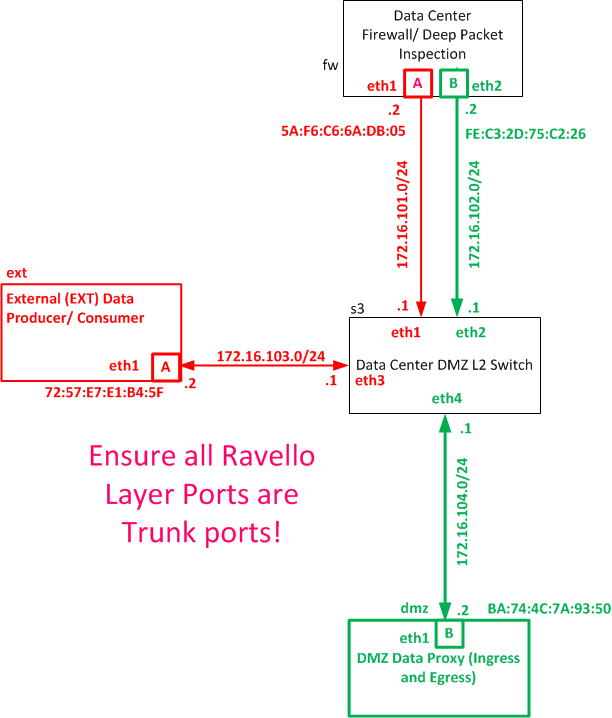
Our test uses the following architecture, and Ravello allows us to access layer two services in a cloud environment:

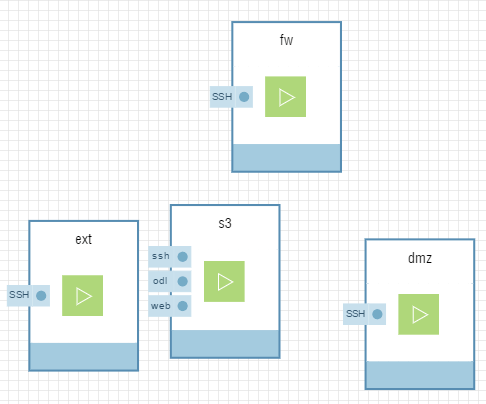
Deploy four Linux virtual machines with Open vSwitch version 2.3.1 or greater.
You can leave the management ports for all VMs with the default (AutoMac/ VirtIO/ DHCP/ Public IP) settings.
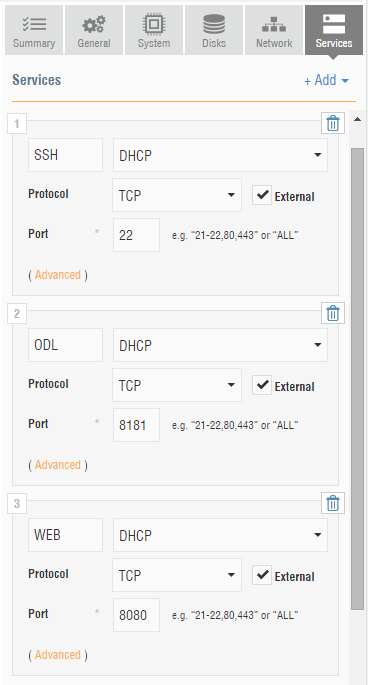
Be sure to enable SSH as a service for all four VMs.
Your central "s3" VM will contain the virtual switch and controller, so open up ports 8181 (ODL) and 8080 (Web).
Each of the arrows in our Architecture diagram represents a physical link, or wire.
We simulate these physical wires in the Ravello layer as a network underlay.
While we configure this Ravello layer with IP, the Ravello layer presents these networks as physical links to our Virtual Machines:
Some troubleshooting hints:
- Ensure all ports are trunk ports (it is okay to keep the Management ports as Access 1)
- You will be tempted to make the underlay links /30, since they are point to point. Ensure, however, that you make these /24s, as in the diagram above
We do not show the management ports (eth0) in the diagram above, since they are out-of-band.
Be sure to include the MAC addresses above, since we will use these values to trigger OpenDaylight services.
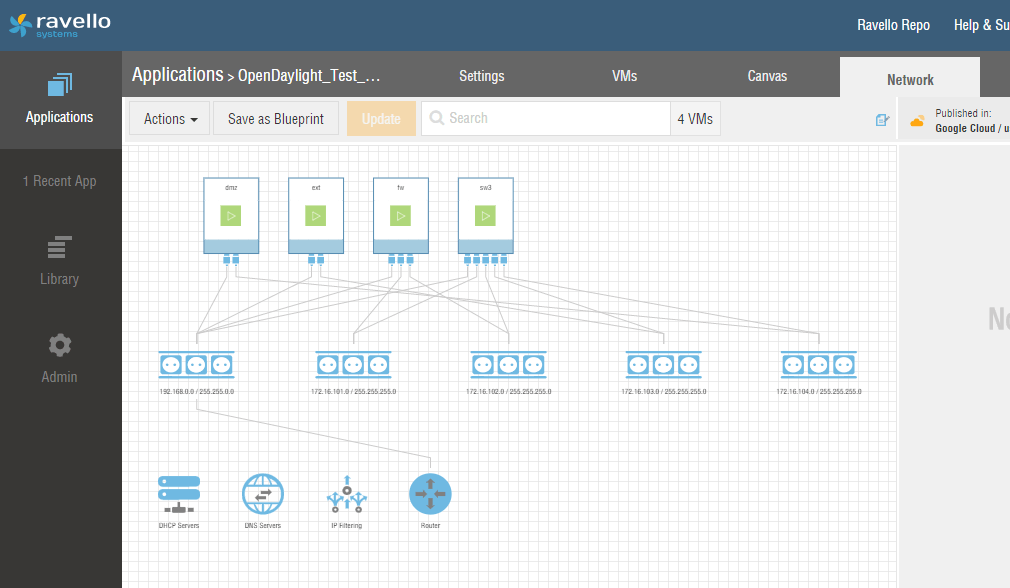
Configure your canvas to match the same Layer 3 and Layer 2 topology above. As an example, you would set the following Network configurations for the "ext" VM above:
- Name: eth1
- MAC: 72:57:E7:E1:B4:5F
- Device: e1000 (default)
- Static IP: 172.16.103.2
- Netmask: 255.255.255.0
- Gateway:
- DNS:
- External Access: Inbound (OFF), Outbound (ON), Public IP (Uncheck "even without external services")
- Advanced: Mode (Trunk), VLAN Tags ()
Repeat the appropriate configurations for all four Virtual Machines. Your network will look like the following diagram:
Once you finish configuring your Ravello layer, you can SSH into the virtual machines. Note, at this virtual machine layer you will configure different IP addresses for the Virtual Machine NICs (but the MAC addresses will match).
EXT Server
The EXT server simulates an un-trusted client and server. Edit the NIC:
 $ sudo vim /etc/network/interfaces.d/eth1.cfg
    auto eth1
    iface eth1 inet static
    address 10.10.1.102
    netmask 255.255.255.0
    post-up route add -net 10.10.2.0 netmask 255.255.255.0 gw 10.10.1.1
    post-up route add -net 6.6.6.0 netmask 255.255.255.0 gw 10.10.1.1
You will need to restart the network service for the change to take effect.
$ sudo service networking restart
Then upload server.py and create a file named "test.txt".
Finally, issue the following command to pre-populate the arp table:
$ sudo arp -s 10.10.1.1 5A:F6:C6:6A:DB:05
DMZ Server
Run the following shell command:
$ sudo vim /etc/network/interfaces.d/eth1.cfg
   auto eth1
   iface eth1 inet static
   address 10.10.2.101
   netmask 255.255.255.0
   post-up route add -net 10.10.1.0 netmask 255.255.255.0 gw 10.10.2.1
   post-up route add -net 5.5.5.0 netmask 255.255.255.0 gw 10.10.2.1
$ sudo service networking restart
$ sudo arp -s 10.10.2.1 FE:C3:2D:75:C2:26
In addition, upload server.py and create a file named "test.txt".
Firewall
You need to turn the "firewall" into a router to pass traffic between the two NICs and make the change permanent:
$ sudo sysctl -w net.ipv4.ip_forward=1
$ sudo vim /etc/rc.local
      sysctl -w net.ipv4.ip_forward=1

$ sudo vim /etc/network/interfaces.d/eth1.cfg
   auto eth1
   iface eth1 inet static
   address 10.10.1.1
   netmask 255.255.255.0

$ sudo vim /etc/network/interfaces.d/eth1.cfg
   auto eth2
   iface eth2 inet static
   address 10.10.2.1
   netmask 255.255.255.0

$ sudo service networking restart
$ sudo arp -s 10.10.1.102 72:57:E7:E1:B4:5F
$ sudo arp -s 10.10.2.101 BA:74:4C:7A:93:50
L2 Switch
First ensure that your server brought up all interfaces. If not, bring them up manually:
$ sudo ifconfig eth1 up
$ sudo ifconfig eth2 up
$ sudo ifconfig eth3 up
$ sudo ifconfig eth4 up
Then install OVS:
$ sudo apt-get install openvswitch-switch
$ sudo vim /etc/rc.local
   ifconfig eth1 up
   ifconfig eth2 up
   ifconfig eth3 up
   ifconfig eth4 up
   exit 0

$ sudo ovs-vsctl add-br br0
$ sudo ovs-vsctl add-port br0 eth1
$ sudo ovs-vsctl add-port br0 eth2
$ sudo ovs-vsctl add-port br0 eth3
$ sudo ovs-vsctl add-port br0 eth4
$ sudo ovs-vsctl set bridge br0 protocols=OpenFlow13
At this point, you should be able to ping from DMZ to EXT and vice versa. If this is not the case, then follow these troubleshooting hints:
- Pre-populate the arp cache
- Run route commands to ensure proper routes
- Ensure all ports at the Ravello layer are trunk
- Ensure all point to point links at the Ravello layer use a /24 and not /30
- Ensure that the VM Mac Addresses match up with the Ravello layer MAC addresses
- Ensure that NIC's eth1, eth2, eth3 and eth4 on SW3 do not have IP addresses and that the OVS switch ports match up with the Linux Kernel switch ports
- To do this, run $ sudo ovs-ofctl -O OpenFlow13 show br0
Do not proceed until you can ping full mesh across DMZ, EXT, and the FW virtual machines (excluding management ports).
Install OpenDaylight
OpenDaylight allows you to control switches with high level intelligence and abstracted services. First, if you do not already have Java installed, you need to install Java 7(+):
$ sudo apt-get install openjdk-7-jdk
$ sudo update-alternatives --install /usr/bin/java java /usr/lib/jvm/java-7-openjdk-amd64/bin/java 1
$ sudo update-alternatives --config java
Then add the following line to the end of your ~/.bashrc file:
export JAVA_HOME=/usr/lib/jvm/java-7-openjdk-amd64 # This matches sudo update-alternatives --config java
Then download, unzip and run OpenDaylight:
$ wget https://nexus.opendaylight.org/content/repositories/opendaylight.release/org/opendaylight/integration/distribution-karaf/0.3.2-Lithium-SR2/distribution-karaf-0.3.2-Lithium-SR2.zip $ sudo apt-get install unzip $ unzip distribution-karaf-0.3.2-Lithium-SR2.zip
$ /home/ubuntu/distribution-karaf-0.3.2-Lithium-SR2/bin/karaf clean
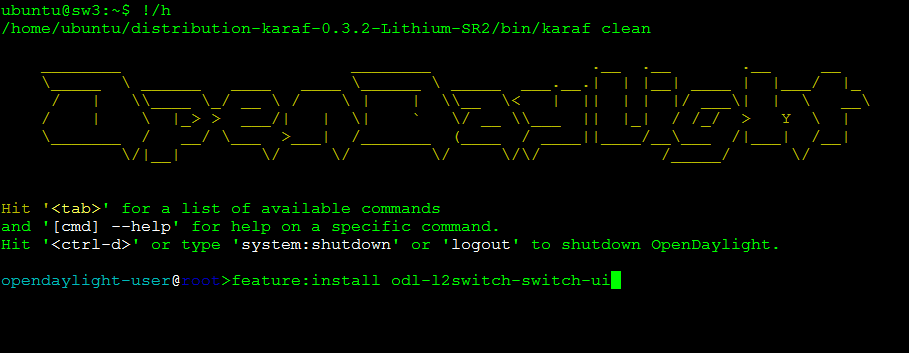
This will take several minutes to start. Once you get the Karaf prompt, only add the following module:
opendaylight-user@root>feature:install odl-l2switch-switch-ui
Installing the odl-l2switch-switch-ui module may also take several minutes.
You can check to see if OpenDaylight started by running:
$ sudo netstat -an | grep 6633
Finally, upload and unzip the REST API scripts.
Connect your OpenVswitch to OpenDaylight
Open a new shell to SW3. If you kill the Karaf prompt, it closes OpenDaylight.
Then, connect to the local Controller:
$ sudo ovs-vsctl set-controller br0 tcp:0.0.0.0:6633
$ sudo ovs-vsctl set controller br0 connection-mode=out-of-band
$ sudo ovs-vsctl list controller
When you list the controller, you will want to see:
connection_mode : out-of-band
is_connected : true
target: "tcp:0.0.0.0:6633"
Ping around your network. It will take some time for the OpenDaylight controller to "learn" your network. The virtual switch off-loads all of the intelligence to the controller.
We recommend first pinging "in network" (i.e., have DMZ and EXT ping their local gateways), and then ping between networks.
Now go to the DLUX GUI and login with admin/admin.
http://<YOUR_IP>:8181/index.html#/login
You will see your devices in the OpenDaylight GUI:
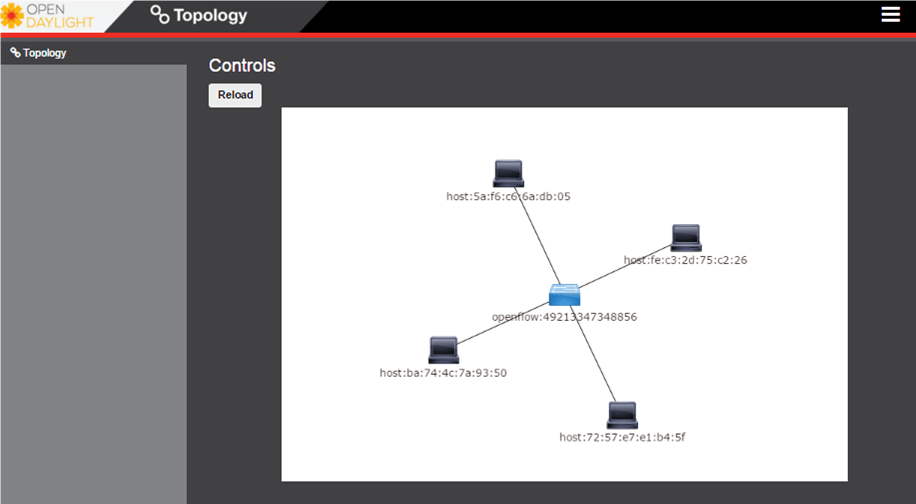
You can also dump the flows of the local switch to show that OpenDaylight "learned" the Layer 2 topology:
$ sudo ovs-ofctl -O OpenFlow13 dump-flows br0 OFPST_FLOW reply (OF1.3) (xid=0x2):
  cookie=0x2a00000000000000, duration=385.025s, table=0, n_packets=729, n_bytes=71328, idle_timeout=1800, hard_timeout=3600, priority=10,dl_src=ba:74:4c:7a:93:50,dl_dst=fe:c3:2d:75:c2:26 actions=output:2
  cookie=0x2a00000000000003, duration=28.425s, table=0, n_packets=2915, n_bytes=285404, idle_timeout=1800, hard_timeout=3600, priority=10,dl_src=72:57:e7:e1:b4:5f,dl_dst=5a:f6:c6:6a:db:05 actions=output:1
  cookie=0x2a00000000000002, duration=28.438s, table=0, n_packets=1695, n_bytes=166034, idle_timeout=1800, hard_timeout=3600, priority=10,dl_src=5a:f6:c6:6a:db:05,dl_dst=72:57:e7:e1:b4:5f actions=output:3
  cookie=0x2a00000000000001, duration=385.030s, table=0, n_packets=1947, n_bytes=190654, idle_timeout=1800, hard_timeout=3600, priority=10,dl_src=fe:c3:2d:75:c2:26,dl_dst=ba:74:4c:7a:93:50 actions=output:4
  cookie=0x2b00000000000000, duration=412.169s, table=0, n_packets=0, n_bytes=0, priority=0 actions=drop
  cookie=0x2b00000000000003, duration=408.298s, table=0, n_packets=914437, n_bytes=89614674, priority=2,in_port=3 actions=output:2,output:1,output:4,CONTROLLER:65535
  cookie=0x2b00000000000001, duration=408.298s, table=0, n_packets=960900, n_bytes=94168048, priority=2,in_port=1 actions=output:2,output:4,output:3,CONTROLLER:65535
  cookie=0x2b00000000000002, duration=408.298s, table=0, n_packets=906546, n_bytes=88841280, priority=2,in_port=4 actions=output:2,output:1,output:3,CONTROLLER:65535
  cookie=0x2b00000000000000, duration=408.298s, table=0, n_packets=905487, n_bytes=88737612, priority=2,in_port=2 actions=output:1,output:4,output:3,CONTROLLER:65535
  cookie=0x2b00000000000001, duration=412.168s, table=0, n_packets=7, n_bytes=1400, priority=100,dl_type=0x88cc actions=CONTROLLER:65535
Lab Execution
To observe the OpenDaylight triggered "egress bypass" service follow these steps:
- Observe baseline operations
- Push a file from the DMZ server to the EXT server
- Observe that traffic passes through the firewall
- Configure our switch with OpenDaylight
- Use the REST API to inject the egress bypass rules into our switch
- Observe egress bypass
- Push a file from the DMZ server to the EXT server once more
- Now observe that traffic does not pass through the firewall
- Observe ingress scanning
- Trigger the DMZ server to pull a file from the EXT server
- Since this flow is ingress, we will observe the traffic pass through the firewall
Observe Baseline Operations
Open separate SSH terminals for your external (EXT) server, DMZ server, and the firewall. Start a web server on your EXT server with the following command, which starts a Python web server that accommodates GET and PUT:
ubuntu@ext:~$ sudo python ./server.py 80
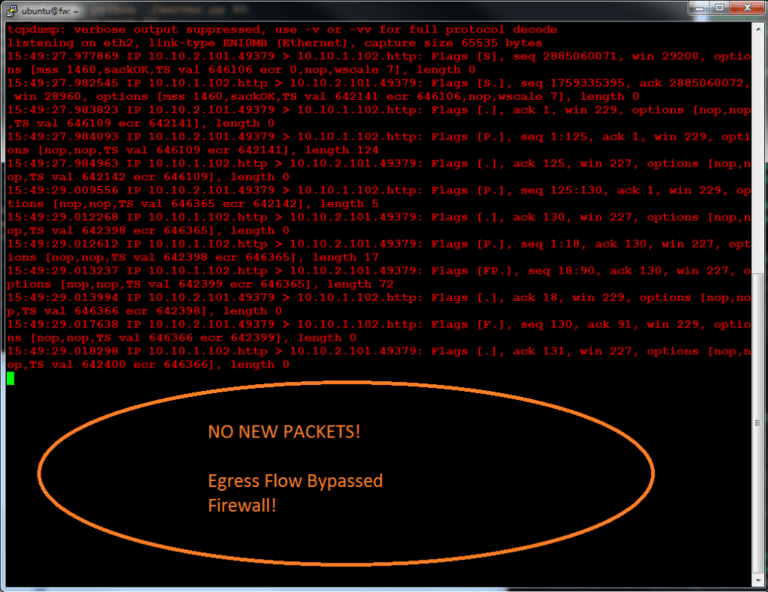
Snoop the traffic on your firewall (FW) with the following command:
ubuntu@fw:~$ clear; sudo tcpdump -i eth2 port 80
Now PUSH a file from DMZ to EXT:
ubuntu@dmz:~$ curl http://10.10.1.102 --upload-file test.txt
We will see success on the DMZ shell, via the following message:
ubuntu@ext:~$ sudo python ./server.py 80

   Starting a server on port 80
   ----- SOMETHING WAS PUT!! ------
   User-Agent: curl/7.35.0
   Host: 10.10.1.102
   Accept: */*
   Content-Length: 5
   Expect: 100-continue
   10.10.2.101 - - [04/Dec/2015 15:49:29] "PUT /test.txt HTTP/1.1" 200 -
   Test
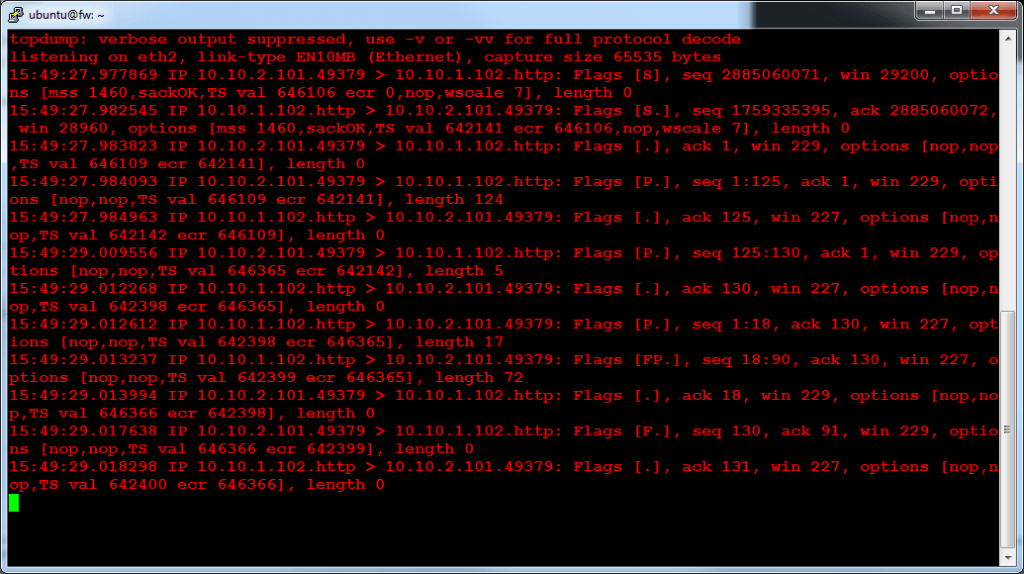
Our PUSH from DMZ to EXT took a path through the firewall, so we see a packet dump on the snoop shell:
Configure Switch with OpenDaylight
If you haven't already, start and connect to OpenDaylight. Refer to the Lab Setup section above for details. Once it started, use the REST API to discover the ID of your virtual switch. In any browser, go to the following address:
http://<YOUR_IP_ADDRESS>:8080/restconf/operational/opendaylight-inventory:nodes/
You should see just one node, your local OVS switch. Copy the ID of the node. For example, we list our ID below (NOTE: DO NOT USE THIS ID, YOURS WILL BE DIFFERENT).
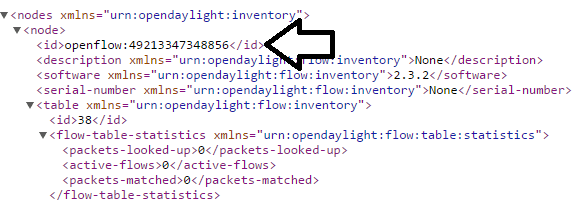
Our switch uses ID 49213347348856. Use this ID in the put_flows.sh script, in order to inject the flows into the switch with the REST API. Alternatively, you can manually install the flows using POSTMAN. From the shell of SW3, run the following command:
ubuntu@sw3:~/demo_fw_flows_ravello$ ./put_flows.sh 49213347348856
> PUT /restconf/config/opendaylight-inventory:nodes/node/openflow:49213347348856/table/0/flow/404 HTTP/1.1
< HTTP/1.1 200 OK
> PUT /restconf/config/opendaylight-inventory:nodes/node/openflow:49213347348856/table/0/flow/505 HTTP/1.1
< HTTP/1.1 200 OK
> PUT /restconf/config/opendaylight-inventory:nodes/node/openflow:49213347348856/table/0/flow/606 HTTP/1.1
< HTTP/1.1 100 Continue
< HTTP/1.1 200 OK
> PUT /restconf/config/opendaylight-inventory:nodes/node/openflow:49213347348856/table/0/flow/707 HTTP/1.1
< HTTP/1.1 100 Continue
< HTTP/1.1 200 OK
> PUT /restconf/config/opendaylight-inventory:nodes/node/openflow:49213347348856/table/0/flow/808 HTTP/1.1
< HTTP/1.1 100 Continue
< HTTP/1.1 200 OK
> PUT /restconf/config/opendaylight-inventory:nodes/node/openflow:49213347348856/table/0/flow/909 HTTP/1.1
< HTTP/1.1 100 Continue
< HTTP/1.1 200 OK
ubuntu@sw3:~/demo_fw_flows_ravello$
If you do not see an "OK" for every flow then run the script again. You can verify that OpenDaylight populated the switch with the following command:
ubuntu@sw3:~$ sudo ovs-ofctl -O OpenFlow13 dump-flows br0
OFPST_FLOW reply (OF1.3) (xid=0x2):
 cookie=0x0, duration=120.455s, table=0, n_packets=0, n_bytes=0, priority=200,tcp,in_port=2,nw_src=10.10.1.102,nw_dst=10.10.2.101,tp_src=80 actions=set_field:5.5.5.5->ip_src,set_field:ba:74:4c:7a:93:50->eth_dst,output:4
 cookie=0x0, duration=120.392s, table=0, n_packets=0, n_bytes=0, priority=200,tcp,in_port=3,nw_src=10.10.1.102,nw_dst=6.6.6.6,tp_src=80 actions=set_field:10.10.2.101->ip_dst,set_field:5a:f6:c6:6a:db:05->eth_dst,output:1
 cookie=0x0, duration=120.616s, table=0, n_packets=0, n_bytes=0, priority=300,tcp,in_port=3,nw_src=10.10.1.102,nw_dst=10.10.2.101,tp_src=80 actions=set_field:ba:74:4c:7a:93:50->eth_dst,output:4
 cookie=0x2b00000000000000, duration=594.845s, table=0, n_packets=0, n_bytes=0, priority=0 actions=drop
 cookie=0x2b00000000000003, duration=591.004s, table=0, n_packets=0, n_bytes=0, priority=2,in_port=3 actions=output:2,output:1,output:4,CONTROLLER:65535
 cookie=0x2b00000000000001, duration=591.006s, table=0, n_packets=0, n_bytes=0, priority=2,in_port=1 actions=output:2,output:4,output:3,CONTROLLER:65535
 cookie=0x2b00000000000002, duration=591.004s, table=0, n_packets=0, n_bytes=0, priority=2,in_port=4 actions=output:2,output:1,output:3,CONTROLLER:65535
 cookie=0x2b00000000000000, duration=591.006s, table=0, n_packets=0, n_bytes=0, priority=2,in_port=2 actions=output:1,output:4,output:3,CONTROLLER:65535
 cookie=0x0, duration=120.580s, table=0, n_packets=0, n_bytes=0, priority=200,tcp,in_port=1,nw_src=10.10.2.101,nw_dst=10.10.1.102,tp_dst=80 actions=set_field:6.6.6.6->ip_src,set_field:72:57:e7:e1:b4:5f->eth_dst,output:3
 cookie=0x0, duration=120.513s, table=0, n_packets=0, n_bytes=0, priority=200,tcp,in_port=4,nw_src=10.10.2.101,nw_dst=5.5.5.5,tp_dst=80 actions=set_field:10.10.1.102->ip_dst,set_field:fe:c3:2d:75:c2:26->eth_dst,output:2
 cookie=0x0, duration=120.616s, table=0, n_packets=0, n_bytes=0, priority=300,tcp,in_port=4,nw_src=10.10.2.101,nw_dst=10.10.1.102,tp_dst=80 actions=set_field:72:57:e7:e1:b4:5f->eth_dst,output:3
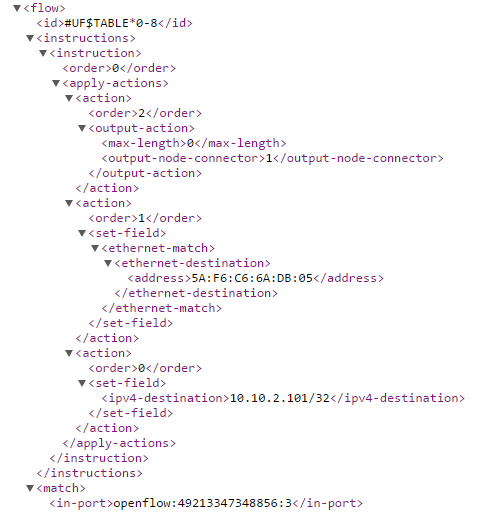
In addition, you can use the REST API with a browser to see the flows. Be sure to substitute your ID in the URL:
http://<YOUR_IP_ADDRESS>:8080/restconf/operational/opendaylight-inventory:nodes/node/openflow:49213347348856/table/0
Observe Egress Bypass
At this point, you should still have your PYTHON server running on EXT and a snoop running on FW. If not, go to baseline operations above to set these up. Now, run the PUSH command from the DMZ server and observe the action:
ubuntu@dmz:~$ curl http://10.10.1.102 --upload-file test.txt
Again, we see "SOMETHING WAS PUT" on our EXT server...
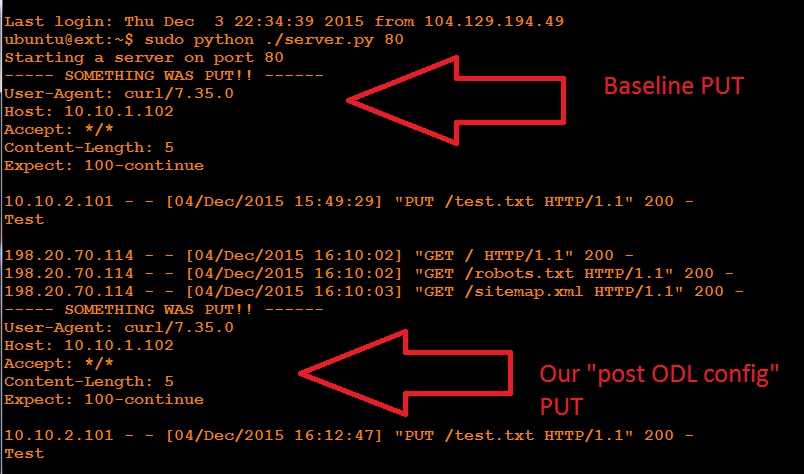
...but this time we do not see traffic on the firewall!
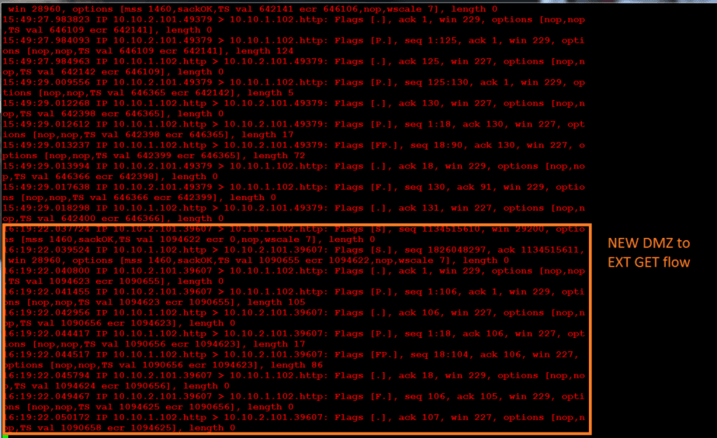
Now, let's do a DMZ GET to EXT. In this case, we treat the flow as ingress, even though the DMZ initiates.
We use a dummy IP to trigger a flow match. The egress port of the switch will NAT it back to the real destination IP.
We see instant feedback on the DMZ Console:
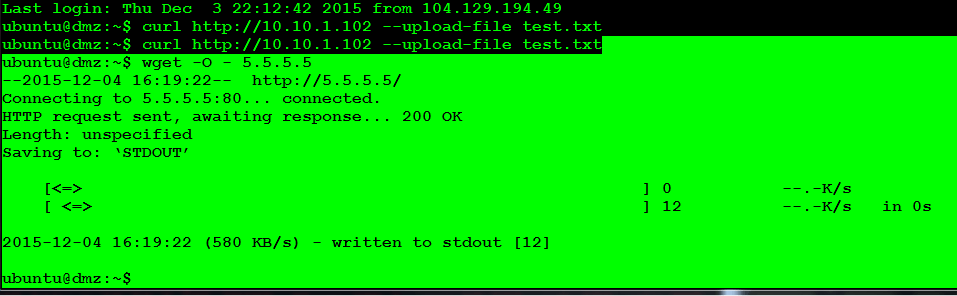
Go to the EXT server and you will see notice of the GET (Note the dummy IP for our server).
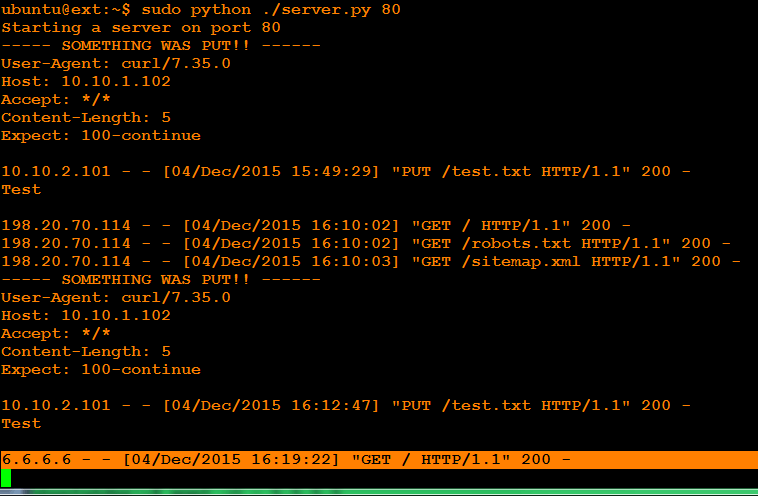
Finally, go to the FW snoop shell and you will see this GET went through the firewall:
Before you end the lab, remove the flows:
ubuntu@sw3:~/demo_fw_flows_ravello$ ./remove_flows.sh 49213347348856
 > DELETE /restconf/config/opendaylight-inventory:nodes/node/openflow:49213347348856/table/0/flow/909 HTTP/1.1
 < HTTP/1.1 100 Continue
 < HTTP/1.1 200 OK
 > DELETE /restconf/config/opendaylight-inventory:nodes/node/openflow:49213347348856/table/0/flow/808 HTTP/1.1
 < HTTP/1.1 100 Continue
 < HTTP/1.1 200 OK
 > DELETE /restconf/config/opendaylight-inventory:nodes/node/openflow:49213347348856/table/0/flow/707 HTTP/1.1
 < HTTP/1.1 100 Continue
 < HTTP/1.1 200 OK
 > DELETE /restconf/config/opendaylight-inventory:nodes/node/openflow:49213347348856/table/0/flow/606 HTTP/1.1
 < HTTP/1.1 100 Continue
 < HTTP/1.1 200 OK
 > DELETE /restconf/config/opendaylight-inventory:nodes/node/openflow:49213347348856/table/0/flow/505 HTTP/1.1
 < HTTP/1.1 200 OK
 > DELETE /restconf/config/opendaylight-inventory:nodes/node/openflow:49213347348856/table/0/flow/404 HTTP/1.1
 < HTTP/1.1 200 OK ubuntu@sw3:~/demo_fw_flows_ravello$

For more fun with OpenDaylight, see my presentation at OpenDaylight. You can find the PowerPoint here or the video here.