Intrusive advertisements, Bloated JavaScript widgets, and Artificial Intelligence (AI) generated, Search Engine Optimized (SEO) slop suffocate our web browsing experience.
Trillion-dollar corporations turned the World Wide Web into a panopticon that tracks your clicks, purchases, and (IRL) location history. Search engines shove users into censored, propaganda-saturated walled garden social media applications, like cattle to a knock box.
In 2019, Solderpunk a Gopher Phlogger created the Gemini protocol to provide a clean, minimal, and focused alternative to the World Wide Web. Today we will discuss the history and purpose of the Gemini protocol, along with instructions on launching your very own Gemini server.
History of the Gemini protocol
The current Web disappoints modern users. Freediver on Hacker News writes:
Legacy, ad-based search, has devolved into a wasteland of misaligned incentives, conflict of interest and proliferated the web full of content farms optimized for ads and algos instead of humans.
To avoid these Internet pitfalls, tech heads retreat to web alternatives like Gopher. Discussions among Gopher fans inspired the creation of the Gemini protocol.
The project Gemini website records the history of the Gemini protocol. It reads:
Project Gemini was born and nurtured in Gopherspace, specifically in the "phlogosphere", that part of Gopherspace where people do what's called "blogging" on the web ("web log" → "blog", "gopher log" → "phlog"). A small but growing community of people were embracing the nearly 30 year old Gopher protocol as a kind of respite from what they perceived as an increasingly commercialised, centralised, resource-hungry, privacy-invading and user-hostile web. Some of them phlogged from time to time about the various ways in which Gopher might, in some people's eyes, be improved with small changes.
The Gopher improvement topic inspired Solderpunk to create the Gemini protocol and develop a Gemini server in Lua.
Over the past five years, the Gemini protocol gained popularity with users. Today (2024), the Gemisphere hosts over half a million unique URLs, spread over roughly 2,750 capsules (the Gemini equivalent to a web site) - Source.
Gemini architecture
When you use an App or Web Browser client on your phone, the client connects to a server that serves pages, images, and videos via the HyperText Transfer Protocol (HTTP).
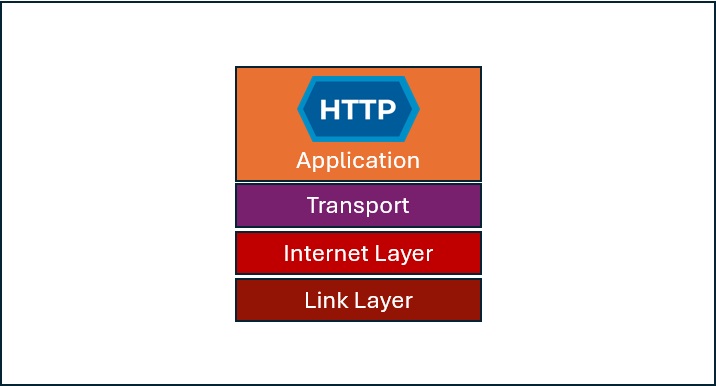
HTTP sits on top of six other Open Systems Interconnection (OSI) model layers, or four layers in the frame of the Transmission Control Protocol/ Internet Protocol (TCP/IP) model, aka the Internet Protocol Stack.
The following graphic captures the Internet Protocol Stack.

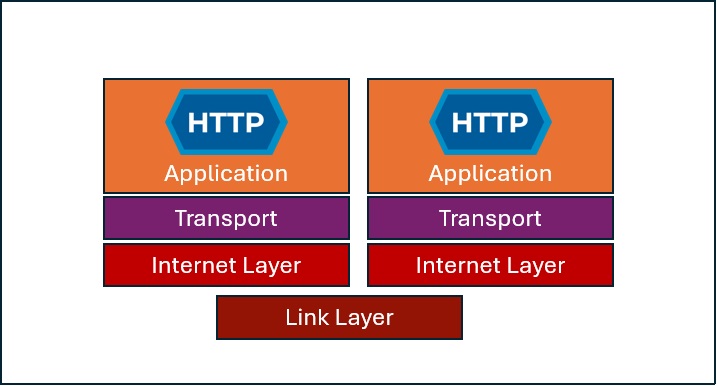
How can Internet Architects create a new Internet? One method deploys Virtual Private Networks (VPN) to the Internet Layer, which uses encryption to create an orthogonal internet. Applications still use HTTP to access web content, and users must authenticate to the VPN for access.
 .
.
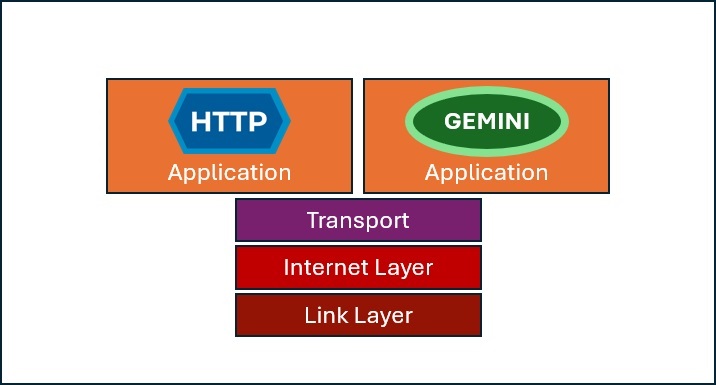
The Gemini Protocol, however, uses the existing Internet Protocol Stack but creates an orthogonal Application at the application layer. The figure below captures this in action:

Difference from the HTTP web
The following table captures the differences in nomenclature and philosophy between HTTP and the Gemini protocol
| Item | HTTP | Gemini |
|---|---|---|
| Entire Corpus of pages | World Wide Web | Geminispace |
| Single Page | Web Page | Gemini Capsule |
| Site | Website | Gemini Server |
| User | Web Surfer | Geminaut |
| Popular Browser | Chrome | Lagrange |
| Markup | HyperText Markup Language | Gemtext |
| Link position | In-line | Dedicated line |
| Internal Links | Supported | Prohibited |
| Multimedia Access | In-line | Separate App |
| Tracking | Cookies | None |
| Client-side code | JavaScript | None |
| Page Appearance | (Remotely linked) Cascading Style Sheets | None |
| Site encryption | Optional | Mandatory |
| Certs for site encryption | Mandatory | Optional |
Gemini Deployment
Most Geminauts develop their own Gemini server from scratch. They pick a favorite language and then code, compile, and deploy the server.
Today, however, I will demonstrate how to deploy an existing server solution onto the Ubuntu Linux Operating System.
Deploy infrastructure
I deployed an Ubuntu Linux 22.04 server into a dedicated Virtual Private Cloud (VPC) via the Amazon Web Services (AWS) Elastic Compute Cloud (EC2) service. I then configured the security policy to allow Secure Shell (SSH) on port 22, HyperText Transport Protocol (HTTP) on port 80, Transport Layer Security (TLS) on port 443, and the Gemini Protocol on port 1965.
I attached a permenant AWS Elastic Internet Protocl (EIP) adress to my server. I purchased the domain gemini.luxury from Go Daddy and then configured the Go Daddy Domain Name Service (DNS) to resolve my hostname to my EIP.
Once I shelled in with my private key (disable password access), I updated the Operating System (OS)
$ sudo apt update
$ sudo apt upgrade
Optional: Launch TLS HTTP Server
I configured an HTTPS service on my server, just to let people on the web know about my gemini server. Apache 2 provides the service. Remember, DNS resolves at the IP layer, so both Gemini and HTTPS will respond to service requests on their respective ports.
$ sudo apt install apache2
$ sudo systemctl is-enabled apache2

enabled
Generate TLS Cert
Both Gemini and Apache 2 (Web) support TLS certs. You can use the same cert for both. Since I own the domain name, gemini.luxury, I can use certbot to sign and register a certificate.
$ sudo apt-get install software-properties-common
$ sudo add-apt-repository ppa:certbot/certbot
$ sudo apt-get update
$ sudo apt-get install certbot python3-certbot-apache
$ sudo certbot --apache
$ sudo systemctl restart apache2
These commands trigger certbot to register a certificate.
Let's encrypt (certbot) will create a cert and private key, and then modify the following two Apache 2 files to use the cert and key:
/etc/apache2/sites-enabled/000-default-le-ssl.conf
/etc/letsencrypt/options-ssl-apache.conf
Together, the new cert and key live in:
SSLCertificateFile /etc/letsencrypt/live/gemini.luxury/fullchain.pem
SSLCertificateKeyFile /etc/letsencrypt/live/gemini.luxury/privkey.pem
Update your crontab to have certbot refresh the cert before expiration.
$ sudo crontab -e
Add the next line to crontab to have certbot check monthly.
# m h  dom mon dow   command
0 0 1 * * /usr/bin/certbot renew --quiet
Install GMID
I recommend the GMID server to serve Gemini capsules.
Install the required compilation tools, configure the environment, make the software, and install the compiled binary.
$ sudo apt install -y build-essential libssl-dev
$ sudo apt install -y libevent* openssl yacc
$ sudo apt install unzip
$ wget https://github.com/omar-polo/gmid/archive/refs/tags/2.1.1.zip
$ unzip 2.1.1.zip
$ cd gmid-2.1.1/
$ ./configure
$ make
$ sudo make install
Create a dedicated Gemini User
Create a dedicated user to run the Gemini server. Do not use root.
$ sudo useradd --system --no-create-home -s /usr/sbin/nologin -c "gmid Gemini server" gmid
$ sudo chown gmid /usr/local/bin/gmid
In the next section, we chroot the Gemini user into a jailed directory via an edit to the configuration file.
Edit the Gemini Config file
Edit the config file with the following drivers:
- Gemini server will use the gemini.luxury TLS cert and key
- Gemini server will Chroot the gemini user, who runs the Service
- Gemini server will support a Tilde server
The working configuration follows:
#/etc/gmid.conf
user "gmid"

chroot "/var/gemini"

server "gemini.luxury" {
       listen on * port 1965
       cert "/etc/letsencrypt/live/gemini.luxury/fullchain.pem"
       key "/etc/letsencrypt/live/gemini.luxury/privkey.pem"

       root "gemini.luxury"

}
See the official GMID docs for more details.
Install Gemini into Systemd
Install gmid into systemd for resiliancy. Systemd will start the service when the physical (or virtual) server reboots.
First, create a systemd file:
$ sudo vim /etc/systemd/system/gmid.service
Edit the file.
[Unit]
Description=Start the Gemini protocol server gmid
After=network.target

[Service]
Type=forking
User=root
Group=root
ExecStart=/usr/local/bin/gmid -c /etc/gmid.conf
Restart=on-failure
RestartSec=60s

[Install]
WantedBy=multi-user.target
NOTE: gmid forks several daemons for logging, security, and serving requests. For this reason, set Type=forking
Once you edit the file, run the systemctl commands:
$ sudo systemctl daemon-reload
$ sudo systemctl start gmid
$ sudo systemctl status gmid

   ...

● gmid.service - Start the Gemini protocol server gmid
     Loaded: loaded (/etc/systemd/system/gmid.service; enabled; preset: enabled)
     Active: active (running) since Sat 2024-10-26 21:12:55 UTC; 1 week ago
    Process: 1613 ExecStart=/usr/local/bin/gmid -c /etc/gmid.conf (code=exited, status=0/SUCCESS)
      Tasks: 6 (limit: 1078)
     Memory: 7.7M (peak: 8.2M)
        CPU: 111ms
     CGroup: /system.slice/gmid.service
             ├─1614 /usr/local/bin/gmid -T server -U gmid -X /var/gemini -J 3 -I 0 -c /etc/gmid.conf
             ├─1615 /usr/local/bin/gmid -T server -U gmid -X /var/gemini -J 3 -I 1 -c /etc/gmid.conf
             ├─1616 /usr/local/bin/gmid -T server -U gmid -X /var/gemini -J 3 -I 2 -c /etc/gmid.conf
             ├─1617 /usr/local/bin/gmid -T crypto -U gmid -X /var/gemini -J 3 -I 0 -c /etc/gmid.conf
             ├─1618 /usr/local/bin/gmid -T logger -U gmid -X /var/gemini -J 3 -I 0 -c /etc/gmid.conf
             └─1619 /usr/local/bin/gmid -c /etc/gmid.conf
If you run into errors, use the journalctl command.
$ sudo journalctl -u gmid

  ...

Oct 26 17:44:01 ip-10-0-3-114 systemd[1]: Starting gmid.service - Start the Gemini protocol server gmid...
Oct 26 17:44:01 ip-10-0-3-114 systemd[1]: Started gmid.service - Start the Gemini protocol server gmid.
Oct 26 17:44:21 ip-10-0-3-114 gmid[4624]: 123.123.123.123:41193 GET gemini://gemini.luxury/ 20 text/gemini
Create the Tilde server
Omar Polo based the gmid Gemini server on the OpenBSD https server. Neither server will follow Symlinks, or symbolic links.
If you want to create a Tilde server, create the directories in the gmid root, and link them to a public_capsule directory in each user's home directory.
This way the Symlink follows the direction that gmid supports.
Execute the next commands to give a user runamuck, for example, tilde access:
$ sudo useradd runamuck
$ sudo passwd runamuck
$ sudo usermod -s /bin/bash runamuck
$ sudo mkdir /var/gemini/gemini.luxury/\~runamuck
$ sudo chown -R runamuck /var/gemini/gemini.luxury/\~runamuck
$
$ sudo su - runamuck
(runamuck)$ ln -s /var/gemini/gemini.luxury/\~runamuck ~/public_html
runamuck can now create an index.gmi file in /home/runamuck/public_capsules and Gemnauts will access the file via gemini://gemini.luxury/~runamuck/.
